Flared nostrils, while seemingly simple, can be a complex physiological response with roots in both our evolutionary past and our present-day stress reactions.
One primary explanation lies in respiration. When we’re experiencing heightened arousal or stress, our bodies go into “fight or flight” mode. This triggers the sympathetic nervous system, leading to a cascade of physiological changes.
Increased heart rate and respiration are key components of this response. The widened nostrils help to maximize airflow, increasing oxygen intake to meet the demands of a potential physical confrontation or escape.
Furthermore, flaring nostrils can be associated with olfactory stimulation. The sense of smell is intricately linked to our emotional responses. A sudden, intense scent (like a threat) could trigger nostril dilation as a way to gather more information about the perceived danger.
Beyond immediate stress reactions, flared nostrils might also signal dominance or aggression, particularly in social contexts. This displays an evolutionary remnant where larger airways were associated with strength and power.
It’s crucial to remember that interpreting body language is complex and context-dependent. While flared nostrils can indicate stress or even aggression, they can also be a simple physiological response to environmental factors like cold air or intense physical activity.
Anger or Aggression Sensory Stimulation
Flared nostrils can be a physiological response to anger or aggression, stemming from several mechanisms:
1. **Increased Respiratory Rate:** Anger often triggers a fight-or-flight response, characterized by increased adrenaline and cortisol levels. These hormones accelerate heart rate and breathing, leading to deeper inhalations that naturally dilate the nostrils.
2. **Muscle Tension:** Anger can cause muscle tension throughout the body, including the muscles surrounding the nose and airways. This tension can constrict nasal passages, prompting a reflex widening of the nostrils to facilitate airflow.
3. Sensory Stimulation: Some studies suggest that flared nostrils might be an involuntary response to perceived threats or aggression from others. The sensory information detected by the eyes, ears, and nose during an altercation can trigger this physiological reaction as a pre-emptive measure for increased alertness and readiness.
4. Hormonal Influences: Testosterone, often linked to aggression, also plays a role in nasal dilation. Increased testosterone levels, particularly in men, can contribute to wider nostrils during moments of anger or confrontation.
It’s important to note that flared nostrils alone are not definitive indicators of aggression. They can occur due to other factors such as physical exertion, allergies, or even strong odors. The context and accompanying behaviors provide crucial clues for interpreting their meaning.
Contact Us
It’s Me and You Clinic – Anti-Wrinkle, Dermal Filler and Skincare Clinic, Kingston, Surrey
Kingston upon Thames, Surrey, United KingdomKT2 6LX
Cultural and Social Interpretations
Nonverbal Communication of Disinterest
In the complex landscape of nonverbal communication, a seemingly subtle gesture like flaring nostrils can carry significant cultural and social weight. Its interpretation hinges heavily on the context in which it occurs, the relationship between the individuals involved, and the broader cultural norms.
Anger is often a primary association with flared nostrils. Across many cultures, this facial expression serves as a signal of irritation, displeasure, or even rage. The widening nostrils may be perceived as a physiological response to heightened arousal, mirroring an animalistic display of dominance or aggression.
However, cultural nuances can significantly influence the interpretation. In some Eastern cultures, flared nostrils might be associated with concentration or focus, rather than anger. Similarly, in certain social contexts, like competitive sports or debates, flaring nostrils could indicate intense engagement or determination.
Beyond anger, flared nostrils can sometimes convey **disinterest**. When someone is bored, unengaged, or simply not interested in what is being said to them, they might subconsciously flare their nostrils as a nonverbal sign of their indifference. This subtle cue may be accompanied by other disengaged behaviors such as lack of eye contact, yawning, or fidgeting.
It’s crucial to remember that **individual differences** play a role as well. Some people are naturally more expressive than others, and their physiological responses might be more pronounced. Similarly, personal experiences and cultural backgrounds shape our understanding and interpretation of nonverbal cues.
Ultimately, determining the precise meaning behind flared nostrils requires careful observation of the entire social situation, including the verbal communication, facial expressions, body language, and the relationship dynamics between the individuals involved.
Displeasure or Contempt Sign of Attention or Interest (Context-Dependent)
Flairing the nostrils, a seemingly subtle gesture, can be a complex act with varying interpretations depending on cultural and social contexts. While sometimes signaling displeasure or contempt, in other situations, it might indicate attention or interest.
Here’s a breakdown of how this gesture can be interpreted:
Displeasure or Contempt
In some cultures, flared nostrils are associated with anger, aggression, or disgust. A person flaring their nostrils might be expressing disapproval, irritation, or even disdain towards the speaker or a situation.
Sign of Attention or Interest
Conversely, in certain social contexts, flared nostrils can signify heightened focus or interest. For example, during a heated debate or an intriguing conversation, someone might unconsciously flare their nostrils as a way to show they are engaged and paying close attention.
Context is Key:**
Understanding the context surrounding the gesture is crucial for accurate interpretation. Consider these factors:
* **Facial expressions:** Are eyebrows furrowed? Is the mouth clenched? These accompanying expressions can provide valuable clues about the emotional state behind flared nostrils.
* **Body language:** Observe other nonverbal cues like posture, gestures, and eye contact. A tense body language combined with flared nostrils might suggest displeasure, while relaxed body language might indicate interest.
Cultural Nuances:**
Cultural background plays a significant role in interpreting body language. What is considered polite or impolite in one culture might have a different meaning in another. Be mindful of cultural differences when analyzing flared nostrils.
In conclusion, flaring nostrils can be both a sign of displeasure or contempt and a manifestation of attention or interest. Careful observation of the entire context, including facial expressions, body language, and cultural background, is essential for understanding this nuanced gesture accurately.
Additional Considerations
Individual Differences Contextual Clues
When interpreting nonverbal cues, understanding ***context*** is crucial. A person flaring their nostrils could signify various things depending on the situation.
Consider the individual’s **body language** as a whole. Are they also displaying other signs of anger, such as clenched fists or narrowed eyes? Or might they be focused intently, perhaps in concentration? The surrounding circumstances provide valuable clues. Is this person engaged in a heated debate, exercising intensely, or experiencing an allergic reaction?
***Individual differences*** play a significant role. Some individuals may naturally flare their nostrils more than others when they are excited, angry, or even simply concentrating. Cultural norms also influence how people express themselves nonverbally. What might be considered aggressive in one culture could be perceived as neutral in another.
Pay attention to ***contextual clues*** offered by the environment and other participants. Are there any underlying tensions or power dynamics at play? Is this a familiar interaction or a new encounter?
For example, flaring nostrils during an argument might signal aggression, while doing so during an intense game of chess could indicate focus. Without considering these factors, it’s difficult to accurately interpret the meaning behind flared nostrils.
Unintentional vs. Intentional Action
Additional considerations regarding nostril flaring are crucial for accurate interpretation.
Firstly, consider the context in which the flaring occurs. Is it during a heated argument, a moment of intense concentration, or a casual conversation? The surrounding situation can significantly influence the meaning behind the gesture.
Secondly, pay attention to other accompanying cues. Does the person’s facial expression change? Are their body postures tense or relaxed? Combined with nostril flaring, these nonverbal signals can provide a more complete understanding.
Thirdly, cultural background plays a role. Some cultures may perceive nostril flaring differently than others. What might be considered rude in one culture could be a neutral gesture in another.
Distinguishing between intentional and unintentional action is essential.
Intentional nostril flaring is often deliberate, serving as a communicative signal like anger, dominance, or challenge.
Unintentional flaring might occur due to physiological reasons, such as:
A stuffy nose causing difficulty breathing.
Exertion during physical activity.
Strong emotions experienced involuntarily.
To determine the intent behind nostril flaring, analyze the overall context, observe accompanying cues, and consider potential physiological explanations.
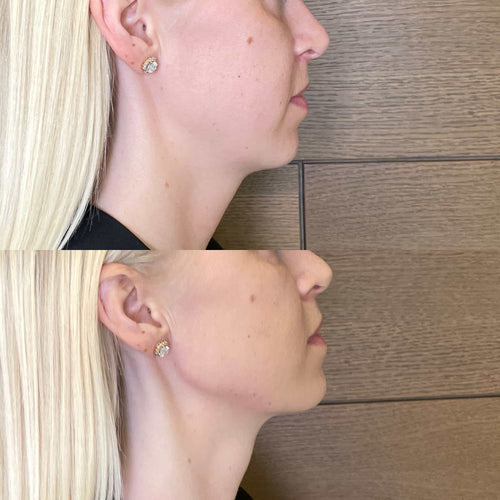
Radiesse, a dermal filler made from calcium hydroxyapatite microspheres suspended in a gel carrier, is known for its ability to add volume and support to facial features.
However, like all dermal fillers, Radiesse is not permanent and will eventually be absorbed by the body.
Several factors influence the lifespan of Radiesse, determining how long its effects last.
Individual Metabolism: Everyone’s body processes substances at a different rate. People with faster metabolisms may experience Radiesse breakdown sooner compared to those with slower metabolisms.
Injection Site: The area where Radiesse is injected plays a role in its longevity. Areas that are more mobile, like the lips or cheeks, tend to see the effects wear off faster than areas with less movement, like the jawline.
Volume Injected: Larger volumes of Radiesse generally last longer than smaller volumes because they provide a more substantial structural support.
Lifestyle Factors: Sun exposure, smoking, and excessive alcohol consumption can all contribute to faster breakdown of dermal fillers.
Skin Care Habits: Proper skin care, including moisturizing and using sunscreen regularly, may help prolong the effects of Radiesse.
While individual results vary, on average, Radiesse can last anywhere from 12 to 18 months.
Some individuals may experience noticeable results for up to two years.
To ensure the best possible outcome and longevity of your Radiesse treatment, it’s important to:
Consult with a qualified and experienced injector who can assess your individual needs and goals.
Follow pre- and post-treatment instructions carefully.
Maintain a healthy lifestyle and practice good skin care habits.
Schedule regular follow-up appointments as recommended by your injector to address any concerns and potentially refresh the results.
Treatment Area
Radiesse, a dermal filler made of calcium hydroxylapatite microspheres suspended in a gel, is known for its longevity compared to other fillers. However, like all injectables, Radiesse results are temporary and will eventually fade.
The lifespan of Radiesse varies depending on several factors:
1.
Treatment Area:
Face:** Radiesse typically lasts 12-18 months in areas like the cheeks, temples, and jawline.
Hands:** Due to more frequent use and thinner skin, Radiesse may last 6-12 months in the hands.
2.
Individual Metabolism and Skin Elasticity:
Faster metabolism can lead to quicker breakdown of the filler.
Thinner, more delicate skin may see results fade faster.
3.
Lifestyle Factors:
Sun exposure can accelerate collagen breakdown and affect filler longevity.
Smoking damages collagen and elastin, reducing the effectiveness of fillers.
4.
Injection Technique:
A skilled injector who places Radiesse correctly can help maximize its duration.
It’s important to note that these are general guidelines, and individual results may vary. Consult with a qualified plastic surgeon or dermatologist for personalized advice regarding Radiesse longevity.
Radiesse, a dermal filler made from calcium hydroxyapatite microspheres suspended in a gel, provides volume and definition to facial contours. Understanding factors that influence its lifespan is crucial for patients considering this treatment.
The lifespan of Radiesse varies depending on several factors, including the individual’s metabolism and lifestyle.
**Individual Metabolism:**
One of the most significant factors influencing Radiesse longevity is an individual’s **metabolic rate**. Individuals with faster metabolisms tend to break down substances, including fillers, more quickly. This can result in a shorter lifespan for Radiesse.
**Lifestyle Factors:**
Several lifestyle factors can also impact Radiesse’s duration:
Sun Exposure: Excessive sun exposure can accelerate filler breakdown, leading to premature fading.
Smoking**: Nicotine constricts blood vessels, hindering nutrient delivery to the treated area and potentially affecting filler longevity.
Dehydration**: Proper hydration is essential for maintaining skin elasticity and overall health. Dehydration can contribute to faster breakdown of fillers.
**Injection Site:** The location where Radiesse is injected also plays a role in its lifespan. Areas with more movement, such as the cheeks and around the mouth, tend to see faster degradation compared to areas with less mobility.
Facial Anatomy**: Differences in facial structure and skin thickness can also influence Radiesse’s longevity. Thinner skin may result in a shorter lifespan due to increased exposure to environmental factors.
On average, Radiesse results last for 12-18 months, but individual experiences can vary widely.
Average Longevity of Results
Typical Duration for Different Areas
Average longevity of results from Radiesse injections can vary depending on several factors, including the individual’s metabolism, lifestyle, sun exposure, and the specific area treated.
However, Radiesse typically lasts for an average of 12 to 18 months.
Here’s a breakdown of typical durations in different areas:
**Face:** The most common areas for Radiesse are the cheeks, temples, and jawline. Results generally last around 12-18 months in these locations.
**Hands:** Radiesse is often used to restore volume and smooth out wrinkles on the hands. Results tend to be longer lasting in this area, typically lasting 18-24 months.
**Other Areas:** When used in other areas like the neck or décolletage, longevity can vary but generally falls within the 12-18 month range.
It’s important to note that these are just average timescales. Individual experiences may differ.
Some people may see results last longer, while others may notice them fading sooner.
Maintaining Results with Touch-Up Treatments
Average Longevity of Results
Radiesse, a dermal filler composed of calcium hydroxylapatite microspheres suspended in a gel carrier, generally lasts for **12 to 18 months**. However, the exact duration can vary depending on several factors, including:
Individual metabolism and skin elasticity
Location of injection
Amount of Radiesse used
Lifestyle factors such as sun exposure and smoking
Maintaining Results with Touch-Up Treatments
To maintain the desired results achieved with Radiesse, **touch-up treatments** are typically recommended every **12 to 18 months**. These booster sessions replenish the filler, helping to prolong its effects.
The frequency of touch-ups may vary based on individual needs and desired outcome. Some patients may find that they require touch-ups more frequently than others.
It’s important to consult with a qualified and experienced injector to determine the optimal treatment plan for your specific circumstances and goals.
Signs Radiesse is Wearing Off
Diminished Volume and Contour Definition
Radiesse, a dermal filler made from calcium hydroxylapatite microspheres, is known for its ability to provide long-lasting volume and contour enhancement.
Unlike hyaluronic acid fillers, which are readily absorbed by the body, Radiesse stimulates collagen production over time. This results in gradual but noticeable improvement in facial volume and definition.
While Radiesse typically lasts longer than most hyaluronic acid fillers, it’s important to understand that its effects are not permanent.
Here are some signs that your Radiesse may be wearing off:
Diminished Volume
One of the primary indicators is a noticeable decrease in facial volume. Areas previously enhanced by Radiesse, such as the cheeks, jawline, or temples, might appear flatter or less defined.
Loss of Contour Definition
As Radiesse gradually breaks down, the contours that it helped create may soften or become less pronounced. This can result in a less sculpted appearance.
Wrinkles and Fine Lines Become More Visible
Radiesse can smooth out wrinkles and fine lines by providing support to the underlying tissues. As its volume diminishes, these lines may become more apparent.
Timeframe for Radiesse Effects to Wear Off
The duration of Radiesse results varies from person to person and depends on factors such as age, skin elasticity, lifestyle, and treatment area.
On average, Radiesse can last anywhere from 12 to 18 months. However, some individuals may experience results that last longer, up to 2 years or more.
It’s important to note that maintenance treatments are typically needed to sustain the desired volume and contour over time.
Appearance of Fine Lines and Wrinkles
Radiesse, a dermal filler made from calcium hydroxylapatite microspheres, is known for its volumizing and lifting properties. Unlike hyaluronic acid fillers that are absorbed by the body over time, Radiesse stimulates collagen production, leading to longer-lasting results.
However, like all dermal fillers, the effects of Radiesse gradually diminish as collagen levels naturally decline. The timeframe for noticeable wear off varies depending on individual factors such as age, skin health, lifestyle, and the treated area.
Generally, you might start noticing subtle signs of Radiesse wearing off around 6 months to a year after treatment. Fine lines and wrinkles may become more prominent, and volume loss in areas like the cheeks or jawline could become more apparent.
Here are some specific signs that your Radiesse results may be fading:
• Increased visibility of fine lines and wrinkles: As collagen production slows down, the smoothing effect of Radiesse lessens, allowing previously softened wrinkles to reappear.
• Loss of facial volume: The plumping effect on cheeks, temples, or jawline diminishes, leading to a flatter appearance.
• Sagging skin: With reduced support from the filler, skin may start to sag more noticeably in areas that were previously lifted.
• Contour definition becomes less pronounced: The sharpness of cheekbones, jawlines, or other contours may soften as volume diminishes.
If you observe these signs and desire to maintain your youthful appearance, a follow-up Radiesse treatment is recommended. Touch-up appointments typically involve injecting smaller amounts of filler to refresh the treated areas and restore fullness and definition.
Loss of Facial Lift
Radiesse, a dermal filler made from calcium hydroxylapatite microspheres suspended in a gel carrier, provides volume and facial lifting by stimulating collagen production beneath the skin.
While Radiesse is known for its longer-lasting results compared to some other fillers, it does eventually wear off over time. The typical duration of Radiesse effects varies depending on several factors, including individual metabolism, age, sun exposure, and lifestyle.
On average, Radiesse can last anywhere from 12 to 18 months, potentially longer for some individuals.
Here are some signs that your Radiesse results may be wearing off:
– Gradual loss of volume in treated areas.
– Diminished cheek definition or lift.
– Appearance of fine lines and wrinkles returning.
– Loss of jawline definition.
– Sagging or drooping in the treatment areas.
If you notice any of these signs, it may be time to consider a follow-up Radiesse treatment to refresh your results and maintain facial fullness.
It’s important to consult with a qualified and experienced injector for a thorough evaluation and personalized recommendations based on your individual needs and goals.
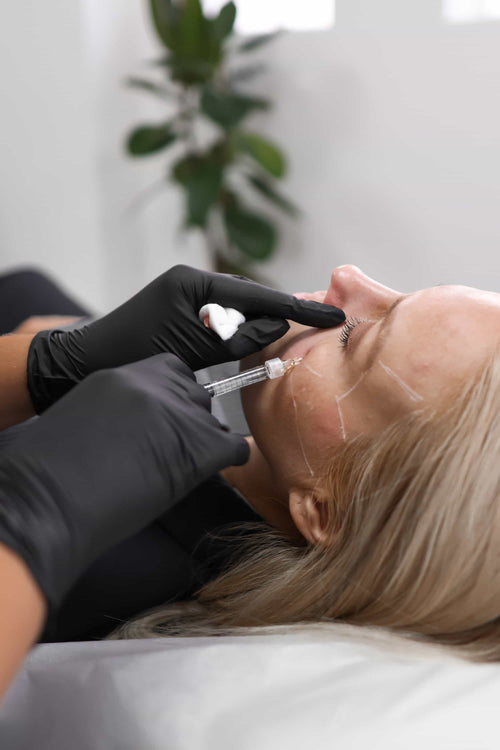
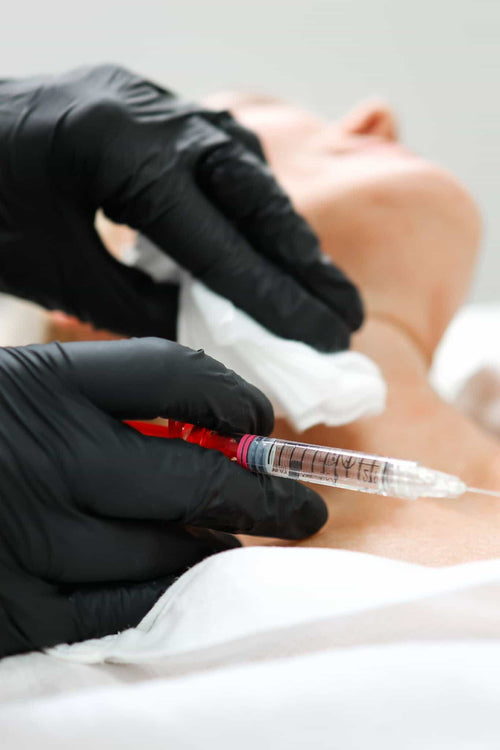
Cannula lip filler refers to a type of dermal filler that is injected into the lips using a blunt-tipped cannula.
Unlike traditional lip fillers which use needles, this method employs a smooth, flexible cannula that glides beneath the skin’s surface.
Cannulas are designed to minimize trauma and reduce the risk of bruising, swelling, or bleeding.
This technique allows for more precise placement of filler and can distribute it more evenly throughout the lips, resulting in a softer, more natural-looking outcome.
Here’s a breakdown of the delivery method:
1. **Consultation and Preparation:** A consultation with a qualified injector is crucial to discuss your desired lip shape and volume goals, as well as assess any underlying medical conditions or allergies.
2. **Anesthesia:** To ensure comfort, a topical anesthetic cream will be applied to numb the injection area.
3. **Cannulation Insertion:** The injector will make small incisions at strategic points around the lips. A cannula is then inserted through these openings and gently maneuvered beneath the skin.
Contact Us
It’s Me and You Clinic – Anti-Wrinkle, Dermal Filler and Skincare Clinic, Kingston, Surrey
Kingston upon Thames, Surrey, United KingdomKT2 6LX
4. Filler Injection: The filler product is gradually injected through the cannula into the desired areas of the lips, such as the Cupid’s bow, philtrum (the vertical groove between the nose and upper lip), or overall lip volume.
5. **Shaping and Molding:** The injector will carefully shape and mold the filler to create the desired lip contours and symmetry.
6. **Post-Injection Care:** After the procedure, ice packs can be applied to minimize swelling and bruising. Follow your injector’s post-care instructions carefully to optimize healing and ensure optimal results.
Benefits over Traditional Fillers
Cannula lip filler is a method of injecting hyaluronic acid dermal fillers using a blunt-tipped cannula, rather than traditional needles.
Hyaluronic acid is a naturally occurring substance in the body that provides hydration and volume to the skin.
Dermal fillers are used to enhance lips by adding volume, smoothing lines, and creating more definition.
The cannula’s blunt tip allows it to glide through the tissue with less trauma compared to needles.
This results in: **reduced bruising**, less swelling**, and a more **comfortable** experience for patients.
Cannulas also have a wider shaft, which can distribute filler more evenly throughout the lip tissues.
Compared to traditional needle-based injections:
– **Less trauma to blood vessels:** This reduces the risk of bruising and bleeding.
– Smoother distribution of filler:** Canulas allow for more precise placement and a more natural-looking result.
– **Faster treatment times:** The cannula allows for quicker injections, leading to shorter overall appointment durations.
– **More comfortable experience:** The blunt tip causes less pain and discomfort than needles.
While both cannula and needle techniques are effective, many patients find cannulas offer a more comfortable and aesthetically pleasing outcome.
It is important to consult with a qualified and experienced injector to determine if cannula lip filler is right for you.
Risks and Considerations
Cannula lip filler refers to a technique for injecting dermal fillers into the lips using a blunt-tipped cannula, a specialized medical tool with a smooth, rounded tip.
Unlike traditional lip filler injections that use sharp needles, cannulas minimize trauma to the surrounding tissue, potentially leading to less bruising, swelling, and discomfort.
The cannula is inserted under the skin, allowing the filler to be gently distributed throughout the lips rather than deposited in a single location. This can create a more natural-looking and smoother result.
Cannulas are often preferred for lip augmentation because they offer greater precision and control during injection. The blunt tip allows the practitioner to navigate delicate areas with ease, minimizing the risk of injecting filler into blood vessels or causing damage to nerves.
While cannula lip fillers generally have a lower risk profile than needle-based injections, some potential risks and considerations exist:
Common Side Effects:
Temporary swelling, redness, and tenderness at the injection site.
Bruising, which may be more pronounced if blood vessels are accidentally punctured.
Asymmetry or unevenness in lip fullness, especially if the filler is not distributed evenly.
Serious but Rare Side Effects:
Infection: This risk is present with any injection procedure. Proper hygiene and sterile techniques are crucial to minimize this risk.
Allergic reactions: Though rare, some individuals may be allergic to the filler material. It’s important to inform your practitioner of any known allergies.
Vascular occlusion: Injecting filler into a blood vessel can block blood flow, leading to tissue damage. This is a serious complication that requires immediate medical attention.
**Considerations Before Getting Cannula Lip Filler:**
Choose an experienced and qualified practitioner who specializes in lip augmentation with cannulas.
Have realistic expectations about the results. Cannula filler can enhance your lip shape and volume, but it’s not a permanent solution and requires touch-up appointments over time.
Discuss any medical history or medications you are taking with your practitioner to ensure cannula filler is safe for you.
Avoid aspirin or other blood-thinning medications for several days before the procedure to reduce the risk of bruising.
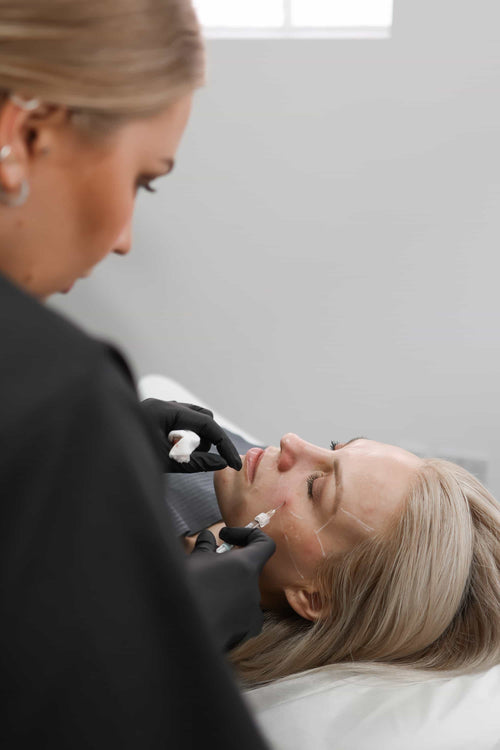
The Procedure
Preparation
“_Cannula lip filler_” refers to a technique for injecting dermal fillers into the lips using a blunt-tipped cannula, rather than traditional needles.
This method has gained popularity due to its potential advantages over traditional needle injections, such as reduced bruising and swelling, less risk of vascular occlusion (blockage of blood vessels), and potentially more even filler distribution.
The _procedure_ typically involves the following steps:
Numbing Cream: A topical anesthetic cream is applied to the lip area to numb the skin and reduce discomfort during injection.
Cannula Insertion:** A small, blunt-tipped cannula is inserted into the lips through a shallow puncture.
Filler Injection: Dermal filler is then carefully injected through the cannula using a slow and controlled technique.
Shaping and Molding:** The filler is gently massaged and molded into the desired shape and volume of the lips.
Post-Procedure Care: Ice packs may be applied to reduce swelling, and patients are advised to avoid certain activities or facial expressions for a specified period.
**Preparation** for cannula lip filler injections involves the following:
Consultation with a Qualified Practitioner: It is essential to consult with a board-certified dermatologist, plastic surgeon, or other qualified practitioner experienced in performing this procedure.
Medical History Review:** The practitioner will review your medical history and any medications you are taking to assess your suitability for the treatment.
Allergies and Contraindications: Inform the practitioner of any allergies, particularly to lidocaine (a common anesthetic used in fillers), or any medical conditions that may make you ineligible for this procedure.
Pre-Procedure Instructions: Follow your practitioner’s pre-procedure instructions carefully, which may include avoiding certain medications, alcohol, or smoking before the appointment.
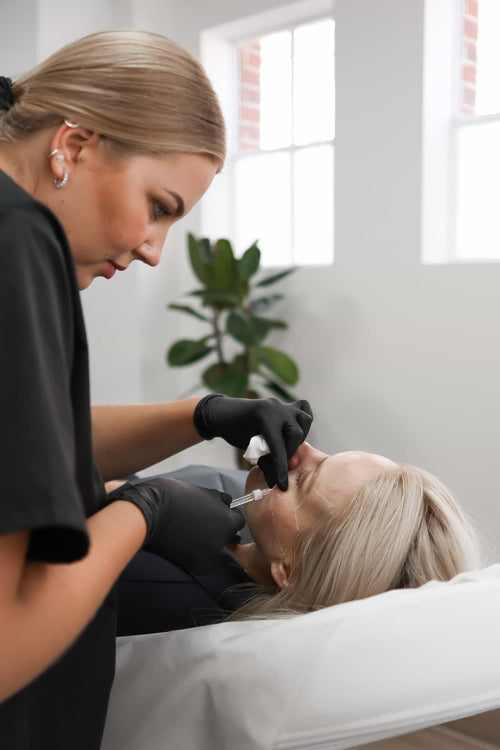
Injection Technique
The procedure for injecting lip filler using a cannula involves several steps and requires expertise from a trained medical professional.
Here’s a detailed breakdown:
Preparation: The patient’s lips are cleansed, and a topical anesthetic is applied to numb the area. This helps minimize discomfort during the procedure.
Cannulation Technique: A cannula, a blunt-tipped flexible tube, is inserted under the skin into the targeted areas of the lips. Unlike needles which pierce through the tissue directly, the cannula glides along the layers of fat and connective tissue.
Filler Injection: The desired amount of lip filler (usually hyaluronic acid gel) is gradually injected through the cannula. The filler is carefully dispersed throughout the target area to achieve the desired shape and volume.
Shaping & Molding: The practitioner gently massages the lips after injection, ensuring the filler is evenly distributed and shaped according to the patient’s goals. This helps create a natural-looking enhancement.
Post-Procedure Care: Ice packs may be applied to reduce swelling and bruising. The patient will receive instructions on how to care for their lips after the procedure, including avoiding excessive sun exposure, touching the injection sites, or strenuous activity.
The cannula technique offers several advantages over traditional needle injections:
* Reduced bruising and swelling: The blunt tip of the cannula causes less trauma to blood vessels, minimizing the risk of bleeding and bruising.
* **Safer for delicate areas:** The cannula’s glide minimizes pressure on surrounding tissues, making it safer for sensitive areas like the lips.
* **More precise placement:** Cannulas allow for more controlled and precise injection, leading to better shaping and smoother results. Schedule a Dermal Filler Consultation with Dr. Laura Geige Now
Aftercare
The Procedure:
Cannula lip filler involves injecting hyaluronic acid (HA) filler into the lips using a blunt-tipped cannula, a specialized instrument resembling a small, thin tube.
Before the procedure, a topical anesthetic is applied to numb the lips.
The cannula is then gently inserted into the lip tissue through a small entry point. The HA filler is slowly and strategically injected through the cannula, targeting specific areas of the lips to achieve the desired shape and volume.
Techniques may include:
Adding fullness to thin lips
Creating more defined cupid’s bow (the dip in the center of the upper lip)
Enhancing the pout or “volume” of the lips
The procedure typically takes about 30 minutes to an hour, depending on the desired outcome.
Aftercare:
Proper aftercare is essential for optimal results and minimizing any potential side effects.
Avoid touching or rubbing the lips for several hours after the procedure. This can displace the filler and cause swelling.
Apply ice packs to the lips for 10-15 minutes at a time, several times a day, to reduce swelling and bruising.
Avoid strenuous activity, hot showers, saunas, or anything that raises body temperature for 24 hours.
Drink plenty of water to stay hydrated.
Follow any specific instructions provided by your provider regarding medications, activities, and aftercare routine.
Most swelling and bruising will subside within a few days. It may take up to 2 weeks for the final results to be fully visible.
It’s important to avoid using lipstick or lip gloss immediately after the procedure as they can irritate the injection sites.
Be aware that touch ups are typically needed every 6-18 months, depending on individual factors such as metabolism and lifestyle.
Always consult with a qualified and experienced medical professional for cannula lip filler to ensure safety and optimal results.
Choosing a Qualified Practitioner
Qualifications and Experience
When considering cannula lip filler, it’s crucial to choose a practitioner who possesses the necessary qualifications and experience to ensure safe and effective treatment.
First and foremost, verify that the practitioner is a licensed medical professional. Ideally, they should be a board-certified plastic surgeon or dermatologist with specialized training in facial aesthetics.
Experience is another key factor. Look for a practitioner who has extensive experience performing cannula lip filler injections specifically. Ask about their number of successful cases and any training or certifications they hold in this technique.
Furthermore, inquire about their approach to consultation and treatment planning. A qualified practitioner will take the time to understand your desired outcome, assess your anatomy, and discuss potential risks and complications thoroughly.
Don’t hesitate to ask for before-and-after photos of previous patients to gauge their artistic skill and aesthetic judgment.
Remember, choosing a qualified practitioner is paramount to achieving natural-looking results while minimizing the risk of complications.
Consultation Process
Choosing a qualified practitioner is paramount when considering any aesthetic procedure, including cannula lip filler treatments. Look for someone who:
• Holds relevant medical qualifications and licenses.
• Has specialized training and experience in facial injectables, particularly cannulas.
• Maintains membership with professional organizations like the American Society of Plastic Surgeons (ASPS) or the American Academy of Facial Esthetics (AAFE).
• Possesses a strong understanding of facial anatomy and aesthetics.
A thorough consultation process is essential before undergoing any lip augmentation procedure.
Here’s what you can expect:
Initial Assessment: The practitioner will examine your face, considering your facial structure, symmetry, and desired outcome. They may ask about your medical history, allergies, and any previous cosmetic procedures.
Discussion of Goals: Be prepared to discuss your expectations for the treatment in detail. Show examples of lips you find appealing, but remember that achieving a natural and balanced look is key.
Treatment Plan: The practitioner will recommend an individualized treatment plan based on your assessment and goals. This may involve the type and amount of filler used, injection techniques (like cannula vs. needle), and the expected outcome.
Risks and Benefits: It’s crucial to understand both the potential benefits and risks associated with lip filler treatments. The practitioner should explain these thoroughly, including possible side effects like bruising, swelling, and infection.
Cost and Payment Options: Discuss the cost of the procedure upfront and inquire about available payment plans if needed.
Don’t hesitate to ask questions throughout the consultation. It’s your right to feel comfortable and informed before making any decisions about your health and appearance.
Choosing a qualified practitioner for any aesthetic procedure, particularly one involving injections like cannula lip filler, is paramount to ensuring both safety and desired results. Look for a licensed medical professional with extensive experience in facial anatomy and aesthetics, ideally a board-certified dermatologist, plastic surgeon, or otolaryngologist (ENT doctor).
Prioritize practitioners who specialize in injectables and have a proven track record of successful lip augmentation procedures using cannula techniques. Inquire about their training, certifications, and the number of procedures they’ve performed.
Patient reviews can be invaluable for gauging a practitioner’s skill and competence. Websites like RealSelf, Yelp, and Google Reviews offer platforms for patients to share their experiences. However, it’s essential to approach reviews critically. Look for patterns in feedback, both positive and negative. Pay attention to the specificity of reviews; detailed accounts often provide more insightful information than generic praise or complaints.
Don’t solely rely on star ratings, as these can sometimes be influenced by factors beyond a practitioner’s skill. Read through the full reviews, paying attention to patients’ descriptions of their experience, the results they achieved, and any potential complications they encountered. If you notice recurring concerns or red flags, it might be prudent to consider other practitioners.
Remember that individual experiences can vary, so while reviews offer valuable insights, they shouldn’t be the sole basis for your decision. Consult with multiple practitioners, ask detailed questions about their approach to cannula lip filler, and ensure you feel comfortable and confident in their expertise before making a choice.
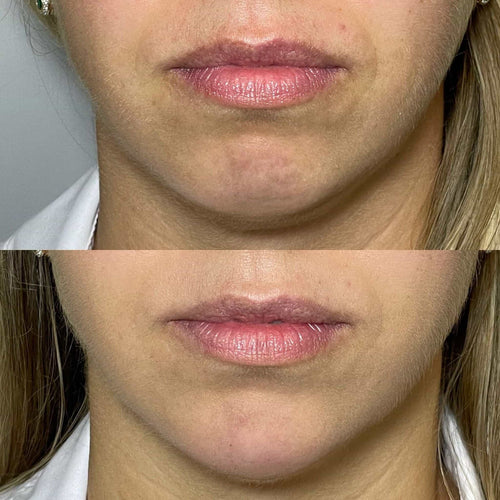
Lip fillers are a popular cosmetic procedure that can enhance lip size, shape, and definition.
The primary ingredient in most lip fillers is **hyaluronic acid (HA)**, a naturally occurring substance in the body that attracts and retains moisture.
HA-based fillers provide a natural-looking plumpness and can be tailored to individual needs.
Here are some common types of HA-based lip fillers:
Contact Us
It’s Me and You Clinic – Anti-Wrinkle, Dermal Filler and Skincare Clinic, Kingston, Surrey
Kingston upon Thames, Surrey, United KingdomKT2 6LX
Restylane
Juvederm
Belotero
These fillers come in different formulations with varying levels of viscosity, allowing for precise application and customization.
Besides HA, there are other types of lip fillers available, such as:
**Poly-L-lactic acid (PLLA)**: This filler is a synthetic biocompatible material that stimulates collagen production over time. It offers long-lasting results and can improve lip volume.
Microneedling with platelet-rich plasma (PRP)**:
This involves injecting the patient’s own platelet-rich plasma into the lips to stimulate collagen production and enhance fullness.
It’s important to consult with a qualified and experienced medical professional, such as a dermatologist or plastic surgeon, to determine which type of lip filler is best suited for your individual needs and goals.
Hyaluronic Acid
Other Fillers
## Considerations When Choosing a Lip Filler
When considering lip filler options, it’s essential to understand the various types available and their unique characteristics. Beyond hyaluronic acid, other fillers are used to enhance lips, each with specific advantages and considerations.
One common alternative is poly-L-lactic acid (PLLA). PLLA is a biodegradable synthetic polymer that stimulates collagen production. It provides gradual volume enhancement over several weeks as the body naturally generates new collagen. PLLA fillers are often favored for their long-lasting results, typically lasting up to two years.
Another option is calcium hydroxylapatite (CaHA). This biocompatible material is a natural mineral found in bones and teeth. CaHA fillers provide immediate volume and lift, similar to hyaluronic acid, but with a longer duration, often lasting up to 18 months. They are known for their smooth texture and ability to create natural-looking contours.
Other fillers include polyacrylamide gel (PAG) and silicone. PAG is a synthetic polymer that was once popular but has become less common due to potential complications. Silicone fillers are permanent and can be extremely risky. They carry a high risk of migration, nodules, and other adverse reactions.
It’s crucial to consult with a qualified and experienced injector to determine the most suitable filler for your individual needs and goals. Factors to consider include desired outcome, budget, skin type, allergies, and medical history. A thorough assessment will help ensure safe and effective lip enhancement results.
People choose lip fillers for a variety of reasons, driven by their unique needs and aesthetic preferences. Some common motivations include:
Increasing lip volume:
Enhancing lip shape and definition:
Restoring lost fullness due to aging or thin lips:
Creating a more symmetrical appearance:
Boosting self-confidence and enhancing facial features:
The desired outcome and the amount of filler required will vary significantly depending on an individual’s starting point, desired look, and personal goals.
Potential Side Effects and Risks
Like any medical procedure, lip filler injections carry potential side effects and risks. It’s crucial to understand these before undergoing treatment:
Injection site reactions:
Swelling: This is the most common side effect and typically subsides within a few days.
Bruising: Minor bruising can occur and usually resolves on its own within 1-2 weeks.
Redness and warmth:
Tenderness or pain at the injection site.
Allergic reactions:
Although rare, some individuals may experience allergic reactions to the filler material. It’s important to inform your practitioner about any known allergies beforehand.
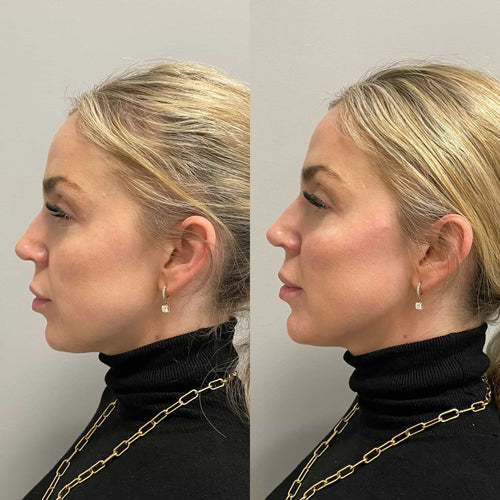
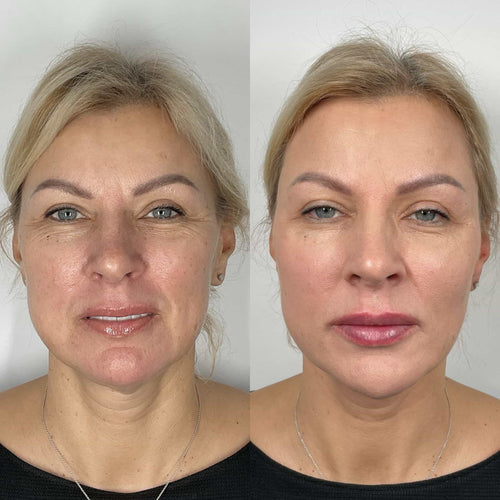
Radiesse is a dermal filler that contains calcium hydroxylapatite microspheres suspended in a gel carrier. Unlike other fillers that rely on hyaluronic acid, Radiesse’s unique composition allows it to stimulate collagen production in the treated area.
The initial boost you see from Radiesse happens immediately after injection.
This is due to the volumizing effect of the microspheres themselves, which instantly lift and fill wrinkles and depressions.
However, the truly impressive results come with time, as your body begins to produce new collagen in response to the microspheres.
The production of this new collagen can take several weeks to fully manifest, usually peaking around 4-6 weeks post-treatment.
Here’s a breakdown of what you can expect:
* **Immediately After:** You’ll notice a reduction in the appearance of wrinkles and folds. Volume will be restored, giving your face a smoother, more contoured look.
* **1-2 Weeks:** Any initial redness or swelling should subside, and the results will become more pronounced as the filler settles into its final position.
* **4-6 Weeks:** This is when the full collagen boost kicks in, leading to further volumization, skin tightening, and a more youthful appearance.
While Radiesse provides long-lasting results compared to other fillers, it’s important to remember that collagen production naturally declines with age.
To maintain optimal results, you may need repeat treatments every 12-18 months, depending on individual factors like skin elasticity and lifestyle.
Gradual Collagen Stimulation
Radiesse, a dermal filler known for its volumizing and stimulating properties, works differently compared to hyaluronic acid fillers.
While hyaluronic acid fillers primarily add volume by hydrating skin tissues, Radiesse utilizes calcium hydroxylapatite microspheres to achieve both immediate volume enhancement and long-term collagen stimulation.
The Initial Boost:
Radiesse delivers an instant volumizing effect upon injection.
This occurs because the calcium hydroxylapatite microspheres directly fill in wrinkles, depressions, and areas requiring augmentation.
Gradual Collagen Stimulation:
Over time, the body recognizes the calcium hydroxylapatite microspheres as foreign bodies.
This triggers a natural inflammatory response, leading to the production of new collagen fibers around the microspheres.
These newly formed collagen fibers provide structural support and improve skin elasticity.
Timeline for Collagen Stimulation:
The initial collagen boost can be noticeable within a few weeks following treatment.
Maximum collagen stimulation typically occurs around 3-6 months after the injection.
Continued collagen production and skin improvement can continue for up to a year or more, depending on individual factors.
It’s important to note that individual results may vary.
Factors such as age, skin type, lifestyle, and overall health can influence the extent and duration of collagen stimulation.
The Peak of Production
Weeks 2-6: The Sweet Spot
Weeks 2-6 after a Radiesse treatment mark what’s known as **_the peak of production_**. This period represents a sweet spot in collagen stimulation and tissue remodeling.
During these initial weeks, the injected Radiesse particles act as scaffolding, stimulating your body’s natural healing response. Fibroblasts, the cells responsible for producing collagen, are attracted to the foreign material and begin generating new collagen fibers around it.
This surge in collagen production leads to a gradual but noticeable improvement in skin volume and texture. Fine lines and wrinkles appear softened, while contours become more defined. The treated area feels firmer and plumper as the newly formed collagen fills in hollows and restores lost volume.
The peak of production typically lasts for several weeks before slowing down. However, the positive effects of this collagen stimulation can be long-lasting. While Radiesse itself degrades over time, the newly stimulated collagen continues to provide support and structure to the skin, maintaining the results for months or even years.
Therefore, understanding that the peak of production occurs during weeks 2-6 after treatment allows patients to anticipate the timeline of their results and manage their expectations accordingly. It’s a crucial period for optimal collagen stimulation and the realization of desired aesthetic outcomes.
Collagen’s Role in Rejuvenation
The concept of “peak production” when it comes to collagen refers to the time during a person’s life when their body generates the highest amount of this vital protein. Collagen is the most abundant protein in the human body, providing structure and support to skin, bones, tendons, ligaments, and other tissues.
Peak collagen production typically occurs in our early twenties. During this period, our bodies are rapidly growing and repairing tissues. However, collagen synthesis gradually declines with age, starting around the age of 25. This decline contributes to the visible signs of aging, such as wrinkles, sagging skin, and loss of elasticity.
Radiesse is a dermal filler that can stimulate collagen production. It’s made from calcium hydroxylapatite microspheres, which are biocompatible and biodegradable. When injected into the skin, these microspheres create volume and lift, but they also trigger a natural inflammatory response. This response stimulates fibroblasts, the cells responsible for producing collagen.
The duration of time it takes Radiesse to build collagen varies from person to person and depends on factors such as age, skin condition, and individual healing rates. Generally, you may start to see some improvement in collagen production within a few weeks after treatment, with more noticeable results over the course of several months.
Contact Us
It’s Me and You Clinic – Anti-Wrinkle, Dermal Filler and Skincare Clinic, Kingston, Surrey
Kingston upon Thames, Surrey, United KingdomKT2 6LX
It’s important to note that Radiesse doesn’t directly replace lost collagen; it encourages your body to produce its own new collagen. This means the effects are gradual and long-lasting, as the stimulated collagen continues to support skin health.
Maintaining the Benefits
Long-Term Effects of Radiesse
Radiesse, a dermal filler composed of calcium hydroxylapatite microspheres suspended in a gel carrier, is known for its ability to stimulate collagen production.
The process of collagen synthesis begins immediately after Radiesse injection.
Within **days**, the body recognizes the foreign particles as a stimulus and initiates a natural healing response.
This involves the migration of inflammatory cells, followed by the production of new collagen fibers to support and surround the microspheres.
The gradual buildup of collagen creates a lifting effect that smooths wrinkles and restores facial volume.
However, it’s important to note that the visible results of Radiesse treatment aren’t solely due to immediate volume enhancement.
While the gel provides instant lift, the long-term benefits stem from the **continuous collagen production** stimulated by the microspheres.
Over time, as more collagen is synthesized, the skin becomes firmer and more resilient.
The duration of these results varies depending on individual factors such as age, skin thickness, and lifestyle.
Generally, Radiesse can last for **up to 18 months**.
Maintenance treatments may be required to maintain the desired volume and collagen stimulation.
It’s essential to consult with a qualified dermatologist or plastic surgeon who can assess your individual needs and expectations.
They will provide personalized treatment recommendations and address any concerns you may have about Radiesse and its long-term effects.
Lifestyle Factors for Optimal Results
Radiesse, a dermal filler containing calcium hydroxylapatite microspheres, doesn’t directly stimulate collagen production like some other fillers. Instead, it works by providing an immediate volume boost and prompting the body’s natural healing response.
The initial effect of Radiesse is the filling in of wrinkles and folds due to its volumizing properties. As the microspheres are gradually absorbed over time, they leave behind a framework that encourages collagen growth within the treated area.
This stimulated collagen production contributes to maintaining the results achieved by Radiesse over time. It’s important to understand that this collagen boost isn’t instantaneous and takes several weeks to become noticeable.
The duration of Radiesse’s effects varies depending on individual factors such as skin type, lifestyle, and the treated area.
However, most patients experience noticeable results lasting up to 18 months or longer.
To maximize the longevity of Radiesse and promote optimal collagen production, it’s essential to adopt a healthy lifestyle:
– Protect your skin from sun damage by wearing sunscreen daily and seeking shade during peak hours. UV exposure can break down collagen fibers, diminishing results.
– Maintain a balanced diet rich in vitamins, minerals, and antioxidants that support collagen synthesis.
– Stay hydrated by drinking plenty of water to keep your skin supple and healthy.
– Get enough sleep as this allows your body time to repair and regenerate tissues, including collagen.
– Avoid smoking and excessive alcohol consumption, which can impede collagen production and accelerate skin aging.
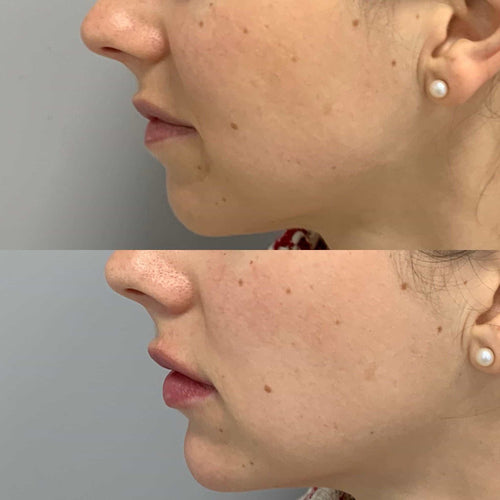
Understanding your face shape is crucial when choosing the right lip filler shape, as it will help you achieve a more balanced and harmonious look.
To determine your face shape, consider the overall proportions of your face, including the length and width of your face, jawline, cheekbones, and forehead. Here are some common face shapes and their characteristics:
Round Face Shape: A round face shape is characterized by a curved jawline, full cheeks, and a similar measurement around the forehead and chin. To balance out a round face shape, look for lip fillers that are longer and more pointed.
Square Face Shape: A square face shape has a strong jawline, angular cheekbones, and a broad forehead. Soften a square face shape with lip fillers that are curvier and more feminine.
Oval Face Shape: An oval face shape is considered the most balanced of all face shapes, with a slightly longer length than width. Oval faces can pull off almost any lip filler style.
Heart-Shaped Face: A heart-shaped face is characterized by a pointed chin and broad forehead. To balance out a heart-shaped face, look for lip fillers that are fuller and more rounded at the bottom.
Triangular Face Shape: A triangular face shape has a narrow forehead, broad cheekbones, and a pointed chin. Soften a triangular face shape with lip fillers that are curvier and more voluminous.
Celebrity-inspired face shapes can also be a great guide when choosing your lip filler style. Here are some popular celebrity-inspired face shapes to consider:
Kylie Jenner’s Lip Filler Style: Kylie Jenner is known for her signature plump, pouty lips. To achieve this look, opt for a longer, more pointed lip liner and fuller lip fillers.
Kim Kardashian’s Lip Filler Style: Kim Kardashian’s lips are famous for their curves and volume. Consider using lip fillers that create a more pronounced cupola shape at the center of your lips.
Cindy Crawford’s Lip Filler Style: Cindy Crawford’s lips are known for their natural, effortless look. Opt for softer, more subtle lip fillers that enhance your natural lip shape without looking too done-up.
Natasha Naginsky’s Lip Filler Style: Natasha Naginsky is a Russian singer with a signature bold, Cupid’s bow pout. Consider using lip fillers that create a more defined cupola shape at the center of your lips.
When choosing your lip filler style, consider your skin type, facial structure, and personal preferences. It’s also essential to find an experienced healthcare professional or dermatologist who can help you achieve the desired look with your chosen lip filler style.
Before getting lip fillers, make sure to:
Carefully research your options and consult with a qualified healthcare professional
Choose the right type of filler for your skin type and desired result
Follow pre- and post-treatment instructions carefully
Be realistic about your expectations and what results you can achieve
A well-planned lip filler treatment can enhance your natural beauty and boost your confidence. Remember, it’s all about finding the right balance between beauty and realism!
• Oval: characterized by a symmetrical, curved appearance with a slightly longer length (University of California, Los Angeles)
Oval-shaped faces are considered one of the most ideal face shapes for lip fillers, as they provide a balanced and harmonious appearance.
A symmetrical, curved appearance with a slightly longer length is characteristic of oval faces, making them an excellent canvas for lip filler placement.
The ideal candidate for lip fillers with an oval-shaped face has facial features that are in proportion to each other, including the nose, cheeks, and jawline.
A well-defined jawline and prominent cheekbones help to create a strong foundation for the lips, allowing fillers to be placed effectively without looking unnatural.
In terms of lip shape, oval-faced individuals can pull off a wide range of lip liner styles, from soft and subtle to bold and dramatic.
When choosing a lip filler shape, oval-shaped faces are often advised to avoid over-filled lips, as this can accentuate the length of the face and create an unbalanced look.
Instead, oval-faced individuals should opt for a balanced, natural-looking volume that enhances the overall appearance of the lips without overpowering the face.
The key is to find a lip filler shape that complements the existing facial structure, rather than trying to hide or alter it.
A good rule of thumb is to aim for a lip shape that is in proportion to the rest of the face, taking into account the size and shape of the nose, mouth, and jawline.
For example, if the nose is slightly larger than average, fillers may be placed in the upper lip to create a balanced look.
If the cheekbones are prominent, fillers can be placed in the lower lip to add volume and depth.
The art of choosing the right lip filler shape requires a deep understanding of facial anatomy and aesthetics, as well as effective communication with your chosen practitioner.
A skilled practitioner will be able to assess the individual’s face shape and create a personalized plan for achieving a balanced and natural-looking lip shape.
• Round: marked by fullness in the cheeks and a curved jawline
Around faces are characterized by a round face shape, which means that the width of the face is roughly equal to the length. If you have a round face shape, your cheeks are full and rounded, and your jawline is curved.
When assessing your face shape for lip filler purposes, it’s essential to consider the overall proportions of your face. A round face shape can make your features appear fuller than they actually are, which may affect the way fillers look in your mouth.
In general, individuals with a round face shape have full cheeks and a curved jawline, making them more prone to visible lip line definition when using fillers. To create a more defined lip shape, it’s crucial to choose a filler that will enhance your natural features without accentuating any negative aspects of your facial structure.
When choosing the right lip filler shape for a round face, consider the following:
A symmetrical, smooth lip line can help elongate the mouth and create the illusion of more defined lips. To achieve this, look for fillers that are designed to be gentle on the lips and provide subtle definition.
A lip liner or filler that follows the natural curve of your jawline can also help to enhance the shape of your lips. However, it’s essential to use a light hand when applying any product in this area to avoid drawing attention to the curvature of your jawline.
Consider using fillers that provide both volume and definition in the upper lip area. This will create a fuller, more youthful appearance while also adding definition to the lower lip.
A combination of fillers with different textures can also help achieve the desired shape for round faces. For example, using a smooth filler for the outer corner of the mouth and a slightly firmer texture in the center can add depth and dimension without looking unnatural.
It’s also worth considering the color of your lip filler when selecting a product designed to complement a round face shape. Cool-toned fillers tend to create a softer, more natural look that won’t accentuate the fullness of your cheeks.
A good rule of thumb is to avoid using too much filler in one area, as this can lead to an unnatural appearance on round faces. Instead, use subtle, gentle applications to enhance your natural features and create a smooth, defined lip line.
Ultimately, the key to choosing the right lip filler shape for a round face is to strike a balance between volume, definition, and subtlety. By understanding your facial structure and selecting the right products, you can create a beautiful, youthful appearance that enhances your natural features rather than accentuating any negative aspects.
• Square: defined by angular features and a prominent jawline
A face shape that can be described as square has angular features and a prominent jawline.
The bone structure of a square face shape is characterized by a strong, defined cheekbone, a wide forehead, and a prominent chin.
Angular features such as a prominent nose, sharp jawline, and facial bones that are well-defined contribute to the overall square shape of the face.
A square face shape tends to have a shorter, broader face with a more vertical angle between the forehead and the cheekbones.
This shape is often associated with strong, defined facial features that can appear striking but also potentially boxy if not balanced correctly with other facial features.
When it comes to choosing lip filler shapes for square face shapes, it’s essential to consider the overall balance and symmetry of the face.
A symmetrical, cup-shaped lip can be a good choice for square faces as it draws attention upwards, creating a longer and more delicate appearance.
A subtle, defined lip shape is often preferred over an overly full or puffy one, as this style will not add to the angularity of the face but rather help soften its features.
Using thinning lip liner can also help create a softer look around the mouth area while maintaining a balanced appearance with a square-shaped face.
A popular method for achieving these desired effects is by using micro-pigmentation or tattooing to create subtle, precise details that define the lips without adding bulk.
This technique involves carefully outlining the natural lip shape and subtly enhancing it with pigment to achieve a more defined appearance.
With this method, you can avoid the need for injections of fillers, making it a great option for those who are hesitant about the permanence of fillers or prefer a longer-term solution.
In terms of lip filler placement and style, square face shapes tend to do well with fillers placed in the cupid’s bow, as this will help create a more defined, but not overly prominent, appearance on the upper lips.
A balanced approach is key; using too much filler can accentuate the angles of the face and make it appear even more square.
Considering the bone structure and facial features is essential to choose fillers that complement rather than clash with them.
The combination of a well-balanced lip shape, precise definition using micro-pigmentation or tattooing, and judicious placement of fillers can make all the difference for those with square face shapes.
• Heartshaped: featuring a pointed chin and widened temples
A heart-shaped face is characterized by a pointed chin and widened temples, giving it a triangular silhouette.
The forehead, cheeks, and chin are proportionally larger than the jawline, creating an imbalance in the facial structure.
To determine if you have a heart-shaped face, measure the width of your temples from ear to ear.
If they are significantly wider than your forehead, you likely have a heart-shaped face.
Characteristics of Heart-Shaped Faces:
Pointed chin and prominent jawline
widened temples that are more angular than rounded
Forehead is slightly narrower than the temples
Cheeks and forehead are proportionally larger than the jawline
To balance a heart-shaped face, focus on finding lip filler shapes that create symmetry.
A symmetrical lip shape can draw attention to your mouth and balance out the angularity of your temples.
A vertical lip liner or a subtle cat-eye can help elongate the face while a round lip filler can add volume to the cheeks.
Recommended Lip Filler Shapes for Heart-Shaped Faces:
Vertical lip liners: Can create the illusion of longer lashes and extend the facial symmetry
Symmetrical lip fillers: Add volume and shape to both sides, balancing out the face
Rounded lip fillers: Can add a soft touch and distract from angular temple lines
Cat-eye or subtle winged liner: Can help elongate the face while adding drama to the eyes
When choosing lip filler shapes, it’s essential to consider your skin tone, personal style, and facial features.
A professional aesthetician can assess your unique features and recommend the most suitable lip filler shape for a harmonious look.
Considering Your Facial Features
Average Lip Filler Shapes for Each Face Shape
The shape of your lips can greatly impact how well lip fillers look after treatment. Certain face shapes may suit specific lip filler shapes, and understanding these relationships can help you choose the best option for your lips.
Average lip filler shapes for each face shape are:
Heart-shaped faces: For heart-shaped faces, it’s recommended to opt for a **pointed** or **angular** lip liner to balance out the width of the lips. A subtle **plumpness** in the Cupid’s bow area can also help to create a more harmonious shape.
Round faces: Individuals with round faces look best with lip fillers that create definition and angles. A **sharp** or **defined** lip liner and a slight **plumpness** in the Cupid’s bow area can help elongate the lips and balance out the face shape.
Square faces: Square faces have strong, angular features and look great with lip fillers that add curves. A **soft** or **subtle** curve to the lower lip and a slightly **plump** Cupid’s bow area can help soften the overall look of the face.
Oval faces: Oval faces have a balanced shape and can pull off most lip filler shapes. However, for added definition, a **sharp** or **defined** lip liner and a slight **plumpness** in the Cupid’s bow area can enhance the natural contours of the face.
Triangular faces: Triangular faces have narrow lower lips and look best with lip fillers that add volume and curves. A **soft**, **subtle** curve to the lower lip and a slightly **plump** Cupid’s bow area can help balance out the face shape.
diamond-shaped faces: Diamond-shaped faces have striking cheekbones and a narrow chin. For these individuals, a **pointed** or **angular** lip liner and a slight **plumpness** in the Cupid’s bow area can create a harmonious balance with the face shape.
When choosing your lip filler shape, consider the following:
Lip liner: Choose a lip liner that complements your natural lip shape and adds definition. A **sharp** or **defined** liner can create clean lines and enhance the appearance of your lips.
Cupid’s bow area: The Cupid’s bow is the curved area between the nose and upper lip. Adding a slight **plumpness** to this area can help balance out the face shape and create a more harmonious look.
Lower lip volume: For lower lip volume, consider adding **subtle** or **soft** curves to the bottom of your lips. This can help create a more balanced look and prevent the lower lip from appearing too thin.
Upper lip definition: Upper lip definition refers to the shape and curve of the upper lip. Adding a slight **plumpness** or **definition** to this area can help balance out the face shape and create a more harmonious look.
Ultimately, the key to choosing the right lip filler shape is understanding your facial features and finding a balance that complements your natural contours. By considering your face shape, lip liner, Cupid’s bow area, lower lip volume, and upper lip definition, you can find a lip filler shape that enhances your overall appearance and leaves you feeling confident and beautiful.
• Oval: a subtle, natural look with a minimal amount of filler
Oval facial features are generally considered to be the most versatile and adaptable to different lip filler shapes. The oval shape is characterized by a symmetrical, heart-shaped face with high cheekbones and a pointed chin. This type of face shape has a balance of curves and angles, making it easy to pull off various lip liner styles and filler techniques.
A subtle and natural look can be achieved with oval facial features by opting for a **thin** line of lip liner that follows the natural curve of the lips. The lip filler should be placed in a way that creates the illusion of fullness, but not too prominent or exaggerated. A moderate to **slight** amount of filler is usually sufficient to enhance the appearance of the lips without looking overdone.
The key to creating a stunning oval-shaped face with lip fillers is to focus on the cupids bow, which is the curve of the upper lip just above the Cupid’s bend. Placing the filler in this area can create the illusion of fuller lips without looking unnatural or asymmetrical.
When choosing a lip liner style for oval facial features, consider a subtle **winged** shape that follows the natural curve of the lips. This will help to create a more defined lip shape and frame the face nicely. A soft, smudged edge can also be used to create a more subtle look.
For oval facial features, it’s generally recommended to avoid overfilling or using too much filler in one area. Instead, focus on creating a balanced and harmonious look by distributing the filler evenly across the lips. A **soft, natural look is key when working with oval facial features.
The final result should be a lip shape that appears natural and effortless, yet still enhances the overall appearance of the face. By following these guidelines and tips, you can create a stunning and balanced look using lip fillers on oval facial features.
• Round: a more dramatic shape to counterbalance fullness in the cheeks
To complement the natural curves of round facial features, opt for a lip filler shape that creates a more dramatic silhouette to counterbalance fullness in the cheeks.
A round face shape is characterized by a curved jawline and equal-length sides, giving the appearance of being circular or oval in shape. When it comes to choosing a lip liner or lip filler shape, it’s essential to consider this rounded structure to create balance and harmony with the rest of the face.
A more dramatic lip shape can draw attention away from the fullness in the cheeks and create a slimming effect on the lower third of the face. This is achieved by opting for a lip liner or lip filler that creates a longer, thinner shape.
In particular, consider using a pointed lip liner or a lip filler placed along the cupid’s bow to create a more angular, defined shape. This will not only slim down the lips but also create a striking contrast with the fullness in the cheeks.
A classic approach is to use a pointed lip liner that starts at the Cupid’s bow and tapers downwards towards the outer corner of the mouth. This creates a long, slender line that draws attention away from the rounded shape of the face.
Alternatively, you can opt for a more subtle approach by using a lip filler that is placed along the lower lash line or along the Cupid’s bow. This will add volume and definition to the lips without creating a dramatic, angular shape that may accentuate fullness in the cheeks.
In both cases, it’s crucial to balance the lip filler or liner with the rest of your makeup look to avoid drawing attention away from other areas of the face. Consider using a light hand when applying the lip liner or filler, and blend the edges carefully to create a seamless finish.
• Square: softening angular features with gentle, curved lines
Square facial features can be challenging to complement when it comes to lip filler shape, as the goal is to soften angular characteristics while maintaining a natural appearance.
A square jawline and prominent facial features can make the face appear more boxy, so gentle curves in language English are essential to balance out these angles.
When choosing a lip filler shape for square features, consider the following:
Understand your personal style: Think about how you like to present yourself and what makes you feel confident. If you have a bold personality, a bolder lip shape may suit you, while more reserved individuals may prefer a softer look.
Consider the shape of your natural lips: Take note of your natural lip shape and whether it’s already curved or straight. This will help guide your decision on the type of filler shape to choose.
Mirror, mirror: Use a handheld mirror to examine your face from different angles. Pay attention to how the light reflects off your lips and how the shapes appear in relation to your facial features.
Soft, natural-looking curves: Opt for lip fillers that create soft, subtle curves rather than dramatic or angular shapes. This will help balance out your square features without looking too done-up or artificial.
Smile, don’t smile: A genuine smile is essential in determining the best lip filler shape. Consider how you naturally smile and what makes your lips appear more relaxed and natural.
A subtle asymmetry: A small imbalance between the left and right sides of your mouth can actually create a more interesting, dynamic look. However, be cautious not to overdo it – too much asymmetry can come across as unbalanced or even “done-up.”
In terms of specific lip filler shapes, options that soften angular features include:
A Cupid’s bow (the curve of the upper lip) is often a good choice for square faces, as it creates a gentle, inviting smile.
A subtle, upward tilt at the outer corner of the mouth can also help balance out square features and create a more relaxed appearance.
The “hourglass” lip filler shape involves creating volume in the lower lip while maintaining a thinner upper lip. This look suits many face shapes but may require adjustments for those with very square or angular features.
Ultimately, finding the right lip filler shape is about personal preference and understanding how different shapes will appear on your unique facial structure. By considering these factors and working with an experienced practitioner, you can create a look that enhances your natural beauty while complementing your square features.
• Heartshaped: enhancing the pointed chin with a bold lip shape
A heart-shaped face is characterized by a broad forehead, high cheekbones, and a pointed chin.
When it comes to choosing lip filler shape, individuals with a heart-shaped face should consider the following features:
To balance out the broad forehead and high cheekbones, a bold lip shape can help draw attention downwards and create a more harmonious facial proportion.
A pointed chin is naturally accentuated by a bold lip shape that matches the natural curve of the chin.
Avoid symmetrical or overly rounded lip shapes as they can add to the broadness of the forehead and make the face appear even more heart-shaped.
A bold lip shape with a pointed chin can help create a slimming effect on the face, making it appear more oval-shaped. This is because the bold lip line helps distract from the width of the forehead and creates a sense of balance between the two features.
In terms of specific lip filler shapes, the following may be suitable for individuals with heart-shaped faces:
Cupids bow: A classic lip shape that can help balance out the pointed chin and create a more harmonious facial proportion.
Brightening or volumizing lip fillers to add definition to the lips without making them appear overly full.
Sharp, angular lip liner to define the edge of the lips and create a bold look that complements the pointed chin.
It’s also worth noting that maintaining good lip care and hygiene is crucial to ensure that your lips stay healthy and look their best. Regularly exfoliating, moisturizing, and protecting your lips from the sun can help maintain a plump, luscious appearance.
Expert Guidelines for Effective Lip Filler Placement
The Role of the Lip Line in Filler Selection
The art of lip filler placement is a delicate process that requires careful consideration and expertise to achieve natural-looking results. Expert guidelines for effective lip filler placement emphasize the importance of understanding the anatomy of the lips, the role of the lip line in filler selection, and the techniques used to create a balanced and harmonious shape.
A key aspect of effective lip filler placement is understanding the structure of the lips. The lips consist of three layers: the epidermis, dermis, and mucosa. The epidermis is the outermost layer, responsible for protecting the lips from environmental stressors. The dermis is the middle layer, composed of fat cells, blood vessels, and nerve endings. The mucosa is the innermost layer, a thin membrane that lines the lip and contains taste buds.
When it comes to lip filler placement, expert guidelines recommend considering the natural contours of the lips, taking into account the shape, size, and proportions of the mouth. Lip fillers should be placed in areas where there is a lack of volume or definition, such as along the cupid’s bow, the outer edges of the lips, and the vermilion border.
Understanding the role of the lip line in filler selection is crucial. The lip line refers to the visible edge of the lip, marked by a slight indentation where the lip meets the mouth. Expert guidelines recommend selecting fillers that complement the natural shape and color of the lip line.
The choice of filler material also plays a significant role in achieving optimal results. Hyaluronic acid-based fillers, such as Restylane and Juvederm, are popular choices due to their ability to mimic the natural texture and movement of the lips.
Lip filler placement techniques can vary depending on the individual’s anatomy and desired outcome. Soft injection techniques involve injecting fillers into the lips using a syringe or cannula, while permanent makeup techniques involve implanting fillers under the skin using a special instrument.
To create a balanced and harmonious shape, expert guidelines recommend considering the following principles:
A symmetrical lip shape that complements the natural contours of the mouth.
A proportionate ratio between the upper and lower lips.
A defined cupid’s bow, creating a more prominent and inviting smile line.
A smooth, even distribution of filler material to avoid lumps or irregularities.
When it comes to selecting fillers, expert guidelines emphasize the importance of matching the filler material to the individual’s skin type, tone, and desired outcome. For example:
Russian calcium-based fillers are often preferred for individuals with darker skin tones due to their ability to provide more pigment.
Collagen-based fillers, such as Zyderm and Zyplast, may be used for individuals who require a more dramatic transformation or have thinner lips.
Hyaluronic acid-based fillers are generally preferred for most patients due to their natural-looking results and reversible nature.
Ultimately, effective lip filler placement requires a deep understanding of the anatomy, skin type, and desired outcome. Expert guidelines emphasize the importance of considering these factors when selecting the right filler material and technique to achieve optimal results.
• Upper lip line: typically placed at the Cupid’s bow (the curve of the upper lip)
When it comes to choosing a lip filler shape, one of the most critical aspects to consider is expert guidelines for effective placement.
Upper lip line: The upper lip line is typically placed at the Cupid’s bow, which is the curve of the upper lip. This area is considered the natural peak of the upper lip, and placing fillers here creates a more defined and balanced look.
Placing fillers too high on the upper lip can create an unnatural look, with the filler being visible above the Cupid’s bow. Conversely, placing them too low can make the lips appear smaller than desired.
The Cupid’s bow is an anatomical landmark that marks the highest point of the upper lip. It is the curve where the two sides of the lip meet, creating a gentle, S-shaped formation.
Experts recommend using a lip filler placement technique known as the “triangle method.” This involves identifying the Cupid’s bow and then placing the filler in a triangular shape, with one point at the corner of the mouth and two points at the Cupid’s bow. This creates a natural-looking curve that enhances the shape of the upper lip.
The triangle method can be applied to both the lower and upper lips to create a balanced, symmetrical look.
Additionally, experts recommend considering the following factors when choosing a lip filler shape:
Familiarity with facial anatomy: Experts should have a thorough understanding of facial anatomy to place fillers in the most effective and aesthetically pleasing locations.
Patient consultation: A thorough consultation is essential to understand the patient’s preferences, skin type, and lip shape. This helps determine the best filler placement for optimal results.
Filler selection: The choice of filler is critical in achieving the desired look. Experts should select fillers that match the patient’s skin tone and lip structure.
By following expert guidelines for effective lip filler placement, individuals can achieve a natural-looking and balanced lip shape that enhances their overall facial appearance.
• Lower lip line: centered on the natural lip curve
Contact Us
It’s Me and You Clinic – Anti-Wrinkle, Dermal Filler and Skincare Clinic, Kingston, Surrey
Kingston upon Thames, Surrey, United KingdomKT2 6LX
The placement of lip fillers is a crucial aspect of achieving natural-looking results. When it comes to shaping the lips, the key is to create balance and harmony between the upper and lower lips.
A well-placed lower lip line can make or break the overall appearance of the lips. The ideal placement is centered on the natural lip curve, which typically runs from the Cupid’s bow at the top of the upper lip down to the center of the lower lip.
In language English, this means that the lower lip line should be positioned directly below the middle of the cupid’s bow, creating a symmetrical and balanced look.
When the lip filler is placed too high or too low on the lower lip line, it can create an uneven appearance, making the lips look unnatural or even asymmetrical.
For example, if the lip filler is placed too close to the Cupid’s bow, it can give the illusion of a “puffy” upper lip, while placing it too far back on the lower lip line can make the lower lip appear thin and pinched.
A properly placed lower lip line can also help create a more defined lip shape. When the filler is centered on the natural lip curve, it creates a subtle enhancement of the natural shape of the lips, rather than adding volume or fullness in an unnatural way.
A balanced look is achieved when the upper and lower lips are proportionate to each other, with the upper lip slightly larger than the lower lip. The filler should enhance the natural shape of the lips, rather than creating a completely new shape.
When the filler is placed too high on the upper lip line, it can create an unnatural look, while placing it too far forward or backward on the lower lip line can make the lip appear thin or asymmetrical.
In addition to achieving balance and harmony between the upper and lower lips, a well-placed lower lip line should also be considered in relation to the rest of the face. A subtle enhancement of the natural shape of the lips can help create a more defined jawline and facial structure.
A defined jawline is often associated with a more feminine or sculpted look, which is why lip filler placement on the lower lip line can be an effective way to enhance this feature.
When combined with other facial treatments such as Botox or facelifts, lip fillers can help create a more youthful and refreshed appearance.
Ultimately, a well-placed lower lip line is crucial for achieving natural-looking results when using lip fillers. By understanding the ideal placement of the filler on the lower lip line, you can enhance your natural shape and create a balanced and harmonious look that enhances your overall facial structure.
• Angle and shape: balanced with surrounding facial features for a harmonious appearance
A well-placed lip filler can enhance the natural shape and appearance of a person’s lips, while an incorrectly placed filler can lead to an unnatural or asymmetrical look. To achieve a harmonious and balanced appearance, it’s essential to follow expert guidelines for effective lip filler placement.
In determining the ideal placement for lip fillers, it’s crucial to consider the *angle* of the lips in relation to the surrounding facial features. The lips should be positioned at a slight angle to create a natural-looking curve that follows the contours of the mouth and face.
A balanced approach involves considering the shape of the lips in conjunction with the overall *shape* of the face. For example, lips placed too high or too far forward can make a person appear older or more angular, while lips placed too low or too far back can create a disproportionate appearance.
The placement of lip fillers also depends on the individual’s personal preferences and facial structure. For instance, individuals with smaller lips may benefit from *filler placement* that creates a more dramatic curve, while those with larger lips may require less filler to maintain a natural-looking shape.
Some common pitfalls to avoid when placing lip fillers include: over-filling or under-filling the lips, which can lead to an unnatural appearance; asymmetrical placement, which can create a lopsided or uneven look; and filler placement too close to the mouth’s edges, which can result in visible lines or scarring.
To avoid these pitfalls, it’s essential to consult with a qualified and experienced professional who has expertise in lip augmentation. A board-certified *dermatologist* or *plastic surgeon* with extensive training in facial aesthetics can provide personalized guidance on the best approach for your individual needs.
When selecting a lip filler placement strategy, consider the following general guidelines:**
– *_The Cupid’s Bow_* should be placed at a slight angle to create a natural-looking curve.
– The *_lips*_ should be symmetrically filled, with the same amount of filler on both sides.
– The *_filler volume_* should be balanced with surrounding facial features, avoiding excessive or insufficient volume.
– *_Subtle shaping techniques_*, such as contouring and sculpting, can help create a more natural-looking appearance.
Ultimately, effective lip filler placement requires a deep understanding of facial anatomy, aesthetics, and individual client needs. By working with an experienced professional and following expert guidelines, individuals can achieve a harmonious and balanced appearance that enhances their natural beauty.
Lip fillers should be used as a long-term solution to enhance the appearance of your lips, not as a quick fix or permanent solution. Regular touch-ups will help maintain the desired shape and appearance over time, ensuring optimal results.
Important Considerations
Careful Attention to Proportions and Symmetry
The shape and symmetry of lip fillers are crucial considerations when choosing a procedure. A well-balanced proportion between the upper and lower lips can greatly impact the overall appearance of the face.
One important factor to consider is the _lip line_. The natural lip line should be considered in relation to the filler placement, as it will help determine the optimal amount of product needed to achieve a harmonious appearance. A lip line that is too high or too low can throw off the balance of the face.
A **symmetrical** approach to lip fillers is essential for achieving a natural look. Asymmetry can give the impression of an uneven, unnatural shape, and may be noticeable even after the filler has been dissolved. When placing fillers, it’s best to start with small amounts on each side and adjust as needed to achieve balance.
The position of the _labial commissure_ (the angle between the lips) should also be taken into account. Fillers placed too far back or too far forward can affect the natural angle of the lip, leading to an unnatural appearance.
Another key consideration is the **filler-to-lip ratio**. If the filler is too prominent in relation to the natural lip size, it can look unnatural and exaggerated. A more subtle approach, with a lower ratio of filler to lip, tends to result in a more natural-looking outcome.
The type of _lips_ being treated can also impact the shape and symmetry of the fillers. Thin lips may require less filler overall, while fuller lips may be able to accommodate more product without looking unnatural.
A **three-dimensional approach** to lip fillers is essential for creating a natural-looking shape. Fillers should be placed in layers, with each layer carefully shaped and blended to create depth and dimension.
The _anatomy of the face_ should also be taken into account when choosing a lip filler shape. For example, individuals with prominent facial features may require less filler overall, while those with smaller faces may need more to achieve balance.
Finally, it’s essential to work with a qualified and experienced practitioner who has _expertise in lip fillers_ and can help you determine the optimal shape and symmetry for your individual needs.
• Balancing volume in each lip to avoid asymmetry (Royal College of Surgeons)
Understanding the Importance of Symmetry
Symmetry is crucial when it comes to lip fillers, as an asymmetric appearance can be aesthetically displeasing and potentially lead to a less-than-satisfactory outcome. One key aspect of achieving symmetry in lip fillers is balancing the volume in each lip.
Factors Affecting Symmetry
Several factors can impact the symmetry of lip fillers, including:
The type and amount of filler used in each lip
The location on the mouth where the filler is administered (e.g., the cupid’s bow, the vermilion border)
The individual’s natural anatomy and facial structure
Any pre-existing asymmetries or conditions that may affect the lips
The expertise of the practitioner administering the fillers
Risk of Asymmetry with Insufficient Volume Matching
If insufficient volume is matched between the two lips, it can lead to an asymmetrical appearance. This can be caused by various factors, including:
The use of different types or brands of filler in each lip
A discrepancy in the amount of filler injected into each lip
A miscalculation of the individual’s natural lip anatomy and requirements
Consequences of Asymmetry
Asymmetrical lip fillers can have significant consequences, including:
Unsatisfactory aesthetic results
Increased risk of complications, such as lumps or unevenness
Potential for the filler to migrate or dissolve unevenly
Erosion of trust in the practitioner and the treatment itself
Strategies for Achieving Symmetry with Lip Fillers
To minimize the risk of asymmetry, practitioners can employ several strategies, including:
Thoroughly assessing the individual’s natural anatomy and facial structure before administering fillers
Using a combination of imaging technologies (e.g., 3D scanning) to guide filler placement
Administering fillers in small increments, allowing for adjustments as needed to achieve symmetry
Utilizing advanced techniques and products that allow for more precise control over filler distribution
The Role of the Practitioner in Achieving Symmetry
Ultimately, achieving symmetry with lip fillers requires a high degree of expertise, attention to detail, and a deep understanding of the individual’s unique anatomy and requirements. Practitioners must be able to:
Evaluate each patient’s condition and develop personalized treatment plans
Employ advanced techniques and technologies to guide filler placement
Communicate effectively with patients to ensure their expectations are met
Monitor results closely and make adjustments as needed to achieve optimal symmetry and satisfaction
• Avoiding overfilling, which can lead to an unnatural look
“The key to a **natural** lip filler shape lies in avoiding overfilling, which can lead to an unnatural look,”
When choosing a lip filler shape, it’s essential to consider the amount of product used and how it will be distributed throughout your lips.
Overfilling can cause:
The lips to appear **over-plumped**, leading to an unnatural appearance
A **lumpy** or uneven texture
A loss of lip shape definition
A good rule of thumb is to start with a smaller amount of filler and gradually add more as needed, rather than overfilling from the beginning.
It’s also crucial to choose the right type of lip filler for your desired shape. For example:
Dermal fillers** such as hyaluronic acid or calcium hydroxylapatite are great for creating subtle, **natural-looking** volume and shape.
Permanent fillers** like silicone or poly-L-lactic acid can provide more significant augmentation, but may require surgical incisions and have longer recovery times.
A skilled injector will assess the individual’s lip structure, skin texture, and personal preferences to recommend a personalized filler shape that meets their unique needs.
Some additional considerations include:
Lip symmetry**: Ensure that both lips are balanced in terms of size, shape, and volume
Lip shape definition**: Leaving enough natural tissue for lip movement and expression is essential
Lip border**: A smooth, defined lip border can enhance the overall appearance of the lips
By considering these factors and avoiding overfilling, you can achieve a **natural-looking** lip filler shape that enhances your beauty without looking unnatural or artificial.
Kingston upon Thames, Surrey, United KingdomKT2 6LX
First 24 Hours
The immediate post-treatment period after lip filler, particularly within the first 24 hours, is crucial for optimal healing and minimizing risks of complications.
During this time, it’s essential to avoid applying lipstick or any other cosmetics directly to the treated area.
Here’s a detailed breakdown of why:
Swelling & Sensitivity: Lip fillers cause initial swelling and sensitivity as the hyaluronic acid attracts water. Applying lipstick can irritate this delicate skin, potentially exacerbating swelling and causing discomfort.
Traction & Disruption: Lipstick, especially if it’s creamy or heavy, can create traction on the treated lips, pulling at the filler and potentially disrupting its placement.
Risk of Infection: Lipsticks contain various ingredients, some of which might be irritating or even introduce bacteria into the freshly injected area. This increases the risk of infection during a time when the skin is most vulnerable.
It’s best to stick to gentle cleansing with lukewarm water and a mild, fragrance-free soap for the first 24 hours. Once your lips have settled down and the swelling subsides (usually within a few days), you can gradually reintroduce makeup.
Always prioritize proper aftercare instructions provided by your injector to ensure the best possible outcome from your lip filler treatment.
48 Hour Mark
The immediate post-treatment period following lip filler injections is crucial for optimal healing and minimizing complications. Specifically, the 48-hour mark is a significant point in this recovery timeline.
At the 48-hour mark, most of the initial swelling and bruising associated with the procedure should have subsided. The lips may still appear slightly puffy but will be more manageable than the first few hours after treatment.
However, it’s essential to remember that the lips are still healing. They are more delicate and sensitive than usual, making them susceptible to irritation and infection.
During this phase, avoiding lipstick is generally recommended. Lipstick ingredients can irritate the delicate tissues, potentially hindering healing and increasing the risk of complications like infection or discoloration.
While lip balm formulated for sensitive skin can be applied to keep lips moisturized, it’s best to avoid any products with fragrances, dyes, or other potentially irritating ingredients.
Additionally, activities that involve excessive kissing or oral contact should also be minimized during the 48-hour mark as this can further irritate the treated area.
Transition to Everyday Makeup
Choosing Your Lipstick
Transitioning from a full makeup look to everyday makeup is about finding a balance that complements your natural features while enhancing them subtly.
Here are some tips for achieving that effortless everyday glow:
Start with a clean canvas: Prep your skin with a gentle cleanser and moisturizer. This creates a smooth base for makeup application.
Embrace the power of less is more: Opt for lightweight formulas like tinted moisturizers, BB creams, or light coverage foundations.
Define your eyes subtly: Use a neutral eyeshadow palette with browns, taupes, or soft pinks. Stick to one or two shades and blend seamlessly.
Enhance your lashes: Mascara is key for adding definition without looking overdone. A single coat of brown or black mascara will do the trick.
Sculpt gently (optional): If you want a touch of contour, use a cream blush or bronzer and blend it upwards towards your temples to lift your face.
Choosing the right lipstick for everyday wear is all about finding shades that suit your skin tone and personal style.
Nude lipsticks: These are incredibly versatile and flattering on most skin tones. Experiment with different undertones (warm, cool, or neutral) to find your perfect match.
Light pink pinks and berries: These shades add a touch of color without being too overpowering. They’re great for creating a natural flush.
Rose browns and corals: These warm tones are perfect for adding a touch of warmth and vibrancy to your complexion.
Remember, the best lipstick is one that makes you feel confident and comfortable!
Application Technique
Transitioning from a full-coverage makeup look to a more natural “everyday” aesthetic can be liberating and time-saving. It’s about finding a balance between enhancing your features subtly while still looking fresh and polished.
Here are some tips on applying everyday makeup with a focus on transitioning smoothly from bolder looks:
**Skin Prep is Key:** Start with a clean canvas. Use a gentle cleanser, moisturizer, and sunscreen, even if you’re skipping foundation.
**Embrace Lightweight Foundation or Tinted Moisturizer:** These options provide sheer coverage and allow your skin to breathe. Apply with a brush, sponge, or your fingers for a natural finish.
**Conceal Strategically:** Focus on blemishes, dark circles, and redness rather than covering your entire face. Use a concealer that’s one shade lighter than your skin tone and blend carefully.
**Define with Blush and Bronzer:** Cream blush is great for a natural flush; apply to the apples of your cheeks and blend upwards towards your temples. Bronzer can add warmth and definition. Apply lightly to hollows of cheeks, forehead, and jawline.
**Eyes that Enhance:** Skip heavy eyeshadow and opt for neutral tones or a wash of shimmer on the eyelids. Define your lashes with mascara, focusing on the outer corners for a subtle lift.
**Brows That Frame:** Groom your brows with a clear brow gel or light-colored pencil to fill in any sparse areas. The goal is to define shape, not create a dramatic look.
**Lip Choices:** For a natural everyday lip, try tinted lip balm, a sheer gloss, or a lipstick in a nude or pink shade. Avoid overly matte finishes.
**Practice Makes Perfect:** It takes time to perfect any makeup routine. Experiment with different products and techniques until you find what works best for you.
Long-Term Lip Care & Makeup
Protecting Your Investment
Achieving luscious lips with lip filler is a fantastic way to boost confidence and enhance natural beauty. However, after undergoing this procedure, it’s crucial to prioritize your investment by taking proper care of your lips and understanding the timing for applying makeup.
Here’s a comprehensive guide on long-term lip care and makeup application specifically for post-filler lips:
Immediate Post-Procedure Care (First 24 Hours):
Avoid touching or picking at the treated area.
Keep your lips hydrated by applying a gentle lip balm recommended by your injector. Avoid petroleum jelly as it can interfere with healing.
Refrain from wearing lipstick, lip gloss, or any other lip products immediately after treatment.
First Week: Gentle Transition
Continue with gentle hydration and avoid harsh scrubbing.
If desired, you can apply a tinted lip balm or a sheer lipstick after 24-48 hours. Opt for products that are moisturizing and free of fragrances or irritants.
Full Recovery (Week 2 Onward):
You can now wear regular lipstick, but start gradually with lighter shades and build up to bolder colors as your lips heal completely.
Use a lip primer to help lipstick adhere better and last longer.
Avoid matte lipsticks immediately after treatment, as they tend to dry out the lips more.
Long-Term Lip Care: Maintaining Your Investment:**
Apply a hydrating lip balm regularly, even when you aren’t wearing lipstick. This helps maintain plumpness and prevent dryness.
Exfoliate your lips 1-2 times a week with a gentle scrub to remove dead skin cells and encourage cell turnover.
Protect your lips from the sun by applying sunscreen with an SPF of 30 or higher daily, even on cloudy days.
Stay hydrated by drinking plenty of water throughout the day.
Remember that individual healing times may vary. Always follow your injector’s specific instructions and consult them if you experience any unusual symptoms or concerns.
Maintaining Lips After Treatment
After undergoing lip filler treatments, it’s important to prioritize proper aftercare to ensure optimal healing and results. While you might be eager to return to your usual makeup routine, it’s crucial to follow a recommended waiting period before applying lipstick.
Here’s a comprehensive guide on long-term lip care and makeup, focusing on maintaining lips after treatment:
Immediate Post-Treatment Care:
Ice Packs: Apply ice packs to the treated area for 10-15 minutes at a time, several times a day, to reduce swelling and discomfort.
Avoid Touching or Rubbing: Resist the urge to touch or rub your lips excessively, as this can irritate the area and increase the risk of infection.
Stay Hydrated: Drink plenty of water to keep your body hydrated and promote healing.
Elevate Your Head: Sleeping with your head slightly elevated can help minimize swelling.
When Can I Wear Lipstick?
Generally, it’s recommended to wait at least 24-48 hours after lip filler injections before applying lipstick. This allows the filler to settle and reduces the risk of transferring pigments or irritating the treated area.
Long-Term Lip Care:
Sun Protection: Always wear a broad-spectrum sunscreen with an SPF of 30 or higher on your lips, even on cloudy days. Sun exposure can fade fillers and damage lip tissue.
Moisturize Regularly: Use a gentle lip balm to keep your lips hydrated and prevent dryness. Avoid balms with fragrances or dyes that can irritate the skin.
Avoid Smoking: Smoking can accelerate aging and diminish the results of lip filler treatments.
Makeup Tips After Lip Filler:
Once you’re cleared to wear lipstick, follow these tips for optimal application:
Start with a Clean Base: Gently exfoliate your lips with a soft lip scrub or a washcloth to remove dead skin cells.
Choose the Right Formula: Opt for hydrating and nourishing lipstick formulas that won’t dry out your lips. Matte lipsticks can sometimes cling to the filler, making it appear more prominent.
Apply Carefully: Use a lip brush for precise application and avoid over-lining your lips, as this can distort the natural shape created by the fillers.
Physical changes can occur when fillers are used to restore lost volume in various parts of the body, such as the face. One common phenomenon observed is weight gain, which can be attributed to several factors.
When fillers like hyaluronic acid or calcium hydroxylapatite are injected into the skin, they expand and occupy space within the dermis. This displacement can lead to an increase in blood flow and fluid accumulation, resulting in swelling around the treated area.
The rate and extent of weight gain after filler injection vary depending on several factors, including the type and amount of filler used, individual metabolic rates, and overall health conditions. In some cases, the weight gain may be temporary and resolve once the filler starts to degrade or is absorbed by the body.
Swelling, which can manifest as bruising, redness, or puffiness, is a common physical change associated with filler injections. This reaction is often caused by the injection process itself, where the filler is introduced into the skin, causing inflammation and fluid buildup.
The duration of swelling after filler injection depends on several factors, including the size of the treated area, the type of filler used, and individual tolerance to the treatment. In most cases, swelling resolves within a few days to a week, although some individuals may experience lingering effects.
Factors influencing weight gain and swelling following filler injections include:
Contact Us
It’s Me and You Clinic – Anti-Wrinkle, Dermal Filler and Skincare Clinic, Kingston, Surrey
Kingston upon Thames, Surrey, United KingdomKT2 6LX
The amount of filler used: Larger amounts of filler can lead to greater weight gain and increased swelling.
The type of filler: Some fillers, like calcium hydroxylapatite, tend to cause more significant inflammation and weight gain compared to hyaluronic acid.
Individual tolerance: People with a history of bruising or redness may be more prone to swelling and weight gain after filler injections.
Location on the body: Fillers injected into areas like the face, arms, or hands may experience greater weight gain and swelling compared to those injected in other areas.
It is essential for individuals seeking fillers to discuss potential physical changes with their healthcare professional or dermatologist beforehand. They can provide personalized guidance on what to expect during and after treatment, helping to manage expectations and minimize any discomfort or side effects.
Additionally, following post-treatment instructions carefully can help reduce the risk of weight gain and swelling. This may include avoiding heavy lifting, bending, or strenuous activities, applying cold compresses to alleviate swelling, and taking anti-inflammatory medications as directed.
Some individuals may experience persistent swelling or weight gain after filler injections, which can be caused by factors such as:
Poor absorption or degradation of the filler: In some cases, fillers may not break down as expected, leading to prolonged inflammation and fluid accumulation.
Allergic reactions: Rarely, individuals may develop an allergic response to the filler, resulting in severe swelling, redness, or weight gain.
It is crucial for individuals experiencing persistent physical changes after filler injections to consult with their healthcare professional. They can help determine the underlying cause and develop a treatment plan to address any concerns or complications.
The most common physical change observed after injecting fillers into temples is a significant weight gain in that area, which has been reported by various dermatological experts.
This phenomenon is often referred to as ” Temple Puffiness” or ” Temporal Baldness”, although it’s essential to note that these terms are somewhat misleading, as the actual cause of the change is not related to balding or puffiness, but rather to the accumulation of fillers.
When hyaluronic acid or calcium hydroxylapatite fillers are injected into the temples, they can cause a localized increase in blood flow and inflammation, leading to swelling and edema in the treated area.
This swelling can be quite pronounced, causing the skin to appear thicker and more prominent, giving the illusion of weight gain. In some cases, the swelling can be so severe that it may be mistaken for a foreign body, prompting unnecessary removal or revision procedures.
Dr. Joshua Zeichner, clinical assistant professor of dermatology at Mount Sinai Medical Center, has spoken publicly about this phenomenon, stating that “the most common side effect of facial fillers is bruising and swelling, which can persist for several weeks.”
However, the case of Temple Puffiness is a unique manifestation of the physical change, and it’s essential to recognize its distinct characteristics. This condition typically resolves on its own within 2-4 weeks after injection, but in some cases, it may take longer for the swelling to subside.
To minimize the risk of Temple Puffiness, dermatologists recommend the following precautions:
Choosing a qualified and experienced injector who has extensive knowledge of facial anatomy and filler placement
Using smaller needle sizes and higher concentrations of fillers to reduce bleeding and inflammation
Selecting fillers that are more evenly distributed throughout the treated area, such as hyaluronic acid, rather than calcium hydroxylapatite.
Avoiding injection into the same spot repeatedly, as this can cause chronic inflammation and scarring
Monitoring patients closely for signs of swelling or bruising after treatment, and addressing any concerns promptly
It’s worth noting that Temple Puffiness is a relatively rare condition compared to other filler side effects, such as bruising, swelling, or allergic reactions. Nonetheless, it highlights the importance of choosing a skilled injector and following proper filler placement techniques to minimize the risk of complications.
Dermatologists are continually working to improve our understanding of facial fillers and their effects on the body. As research continues, we can expect better guidance for patients seeking cosmetic procedures like temple fillers, including more precise instructions on how to minimize potential side effects.
Causes and Risks
The swelling that occurs after receiving dermal fillers is a common and temporary side effect, but it’s essential to understand its causes and risks to manage expectations.
Swelling, also known as edema, is the body’s natural response to injury or inflammation. When dermal fillers are injected into the skin, they can cause micro-trauma to the surrounding tissue, leading to an immune response and the release of histamine, a chemical that causes blood vessels to dilate and swell.
The severity of swelling depends on several factors, including the type and quantity of filler used, the location on the face, and individual tolerance. Common areas prone to swelling include the cheeks, temples, and lips.
Temporary swelling can be caused by a few factors:
The introduction of a foreign substance into the body can trigger an immune response, leading to inflammation and swelling.
The filler material itself may contain ingredients that cause allergic reactions or intolerance.
Individual differences in skin type, tone, and structure can affect how the skin responds to the filler.
The injection technique and pressure used by the healthcare provider can also impact swelling.
Risks associated with temporary swelling include:
Asymmetry: Swelling can cause unevenness or lopsidedness in the treated area, which may be temporary but can persist for weeks or months.
Redness and bruising: While usually mild, redness and bruising are possible side effects that can take several days to resolve.
Prolonged healing time: In some cases, swelling can delay the recovery process by masking other signs of complications, such as infection or filler migration.
Managing temporary swelling after receiving dermal fillers involves:
Cooling and elevation: Applying an ice pack or cold compress to the affected area can help reduce swelling and ease discomfort.
Avoiding strenuous activities: Refraining from intense exercise, bending, or straining for a few days after treatment can minimize pressure on the treated area.
Topical creams and gels: Over-the-counter creams containing ingredients like arnica, tea tree oil, or peppermint may help alleviate swelling and redness.
It’s essential to follow post-treatment instructions provided by your healthcare provider and attend scheduled follow-up appointments to ensure the filler is settling properly and swelling is resolving as expected. In most cases, temporary swelling resolves on its own within a few days or weeks, but in rare instances, it may persist for several months.
The American Society for Dermatologic Surgery (ASDS) states that temporary swelling is a common side effect of filler injections, and it’s essential to understand the causes and risks associated with this phenomenon.
One of the primary reasons for swelling after filler injections is the body’s natural reaction to the new substance. When a filler material, such as hyaluronic acid or calcium hydroxylapatite, is introduced into the skin, it triggers an inflammatory response. This response increases blood flow to the treated area, causing temporary swelling and redness.
Another factor that contributes to swelling is the displacement of fat cells during the filler injection process. When a filler material is injected beneath the skin, it can push against adjacent fat cells, causing them to become displaced or stretched. This displacement can lead to inflammation, which in turn causes swelling.
Additionally, some people may experience more severe reactions to fillers, including swelling, bruising, and pain. These reactions are often caused by an allergic response or an overreaction to the filler material.
The risk of swelling after filler injections can vary depending on several factors, such as:
_Individual tolerance_ : Some people may be more sensitive to fillers than others and experience a stronger reaction.
_Filler type_ : Different types of fillers have varying levels of inflammation and swelling associated with them. For example, some fillers like hyaluronic acid tend to cause less swelling than others like calcium hydroxylapatite.
_Dose and technique_ : The amount of filler used and the injection technique employed by the practitioner can also impact the risk of swelling.
It’s worth noting that not everyone will experience swelling after fillers, and the severity of the reaction can vary greatly from person to person.
_Precautions and proper care_ : To minimize the risk of swelling, it’s essential to find a qualified and experienced practitioner who uses sterile equipment and follows proper injection techniques. Additionally, following post-treatment instructions carefully can help reduce the risk of complications.
In most cases, swelling after filler injections is temporary and resolves on its own within a few days. However, in some cases, it may persist for longer periods or become more severe.
_Complications_ : In rare cases, swelling can be a sign of a more serious complication, such as an allergic reaction or an infection. If you experience any unusual symptoms or concerns after filler injections, it’s essential to consult with your practitioner promptly.
Long-term Effects
Aesthetic fillers are widely used to enhance facial features and restore lost volume. However, one rare complication associated with these injectables is the occurrence of temple swelling.
Temples can swell due to various reasons, including an allergic reaction to the filler material, infection, or a foreign object left in the tissue during the injection process. This swelling can range from mild to severe and may require medical attention.
In some cases, the swelling can be caused by a condition known as a subcutaneous nodule, where the filler material accumulates under the skin and causes lumps or nodules at the site of injection. This can lead to chronic temple swelling, which may persist for months or even years after treatment.
Another rare but serious complication is the development of a facial asymmetry due to uneven swelling. In extreme cases, this can result in an imbalance that affects not only the appearance but also the function of the face, leading to issues such as difficulty speaking, eating, or closing the eyes.
A severe and potentially life-threatening complication associated with temple swelling is the development of abscesses or cellulitis, which are infections of the skin and soft tissues. These conditions require prompt medical attention to prevent serious consequences, including sepsis or even organ failure in extreme cases.
Additionally, there is a risk of scarring, either as a result of the initial injection process or due to the body’s natural response to the filler material. Chronic swelling can also lead to the formation of keloid scars, which can be permanent and disfiguring.
Furthermore, in rare instances, temple swelling can be caused by a condition known as rhinophyma, which is an excessive growth of tissue on the face, often associated with rosacea. In these cases, medical attention may involve treating the underlying condition rather than just the symptoms.
In any case where temple swelling occurs, it’s crucial to consult with a healthcare professional or a board-certified dermatologist for proper evaluation and treatment. The course of action will depend on the underlying cause of the swelling, but in most cases, this may involve draining the affected area, removing excess filler material, or using antibiotics to treat infection.
Preventing temple swelling requires careful consideration before undergoing any aesthetic procedure involving injectables. This includes discussing your medical history with your healthcare professional, selecting a qualified and experienced practitioner, and following post-treatment instructions carefully to minimize the risk of complications.
A thorough understanding of the risks associated with temple swelling is essential for patients considering fillers or other injectable treatments. By being aware of these potential complications, individuals can make informed decisions about their aesthetic care and take necessary precautions to mitigate any adverse effects.
Long-term effects of filler injections can be severe and lead to complications that may require additional treatments or even surgery.
In rare cases, filler injections can cause more serious problems, including:
Granulomas: These are small, inflammatory bumps that form in response to the filler. They can be painful and may take several months to resolve on their own.
Abscesses: These are collections of pus that can form as a result of an allergic reaction or infection. Abscesses can be severe and may require drainage or antibiotics.
Facial asymmetry: In some cases, filler injections can cause the face to become asymmetric, leading to an uneven appearance.
Nerve damage: The nerves in the face can be damaged during filler injection, leading to numbness, tingling, or other sensory disturbances.
Infection: While rare, infection is a possible complication of filler injections. This can lead to serious health problems and may require antibiotics or even surgery.
The FDA has received reports of these rare complications from both the public and medical professionals alike, highlighting the importance of proper training and technique when administering fillers.
It’s worth noting that not all filler injections will cause long-term effects, and many people do not experience any significant problems after receiving treatments. However, it’s essential for individuals to be aware of the potential risks and take steps to minimize them.
In cases where complications do arise, treatment options may include:
Removal of the filler: In some cases, the filler may need to be removed surgically or through a minor procedure.
Antibiotics or other medications: To treat infections or other underlying conditions that may have contributed to the complication.
Surgery: In severe cases, surgery may be necessary to repair damage to the face or address any underlying issues.
In addition to these specific complications, long-term use of fillers can also lead to more general concerns, such as:
Permanently altered facial structure: Fillers can cause changes to the face that may be permanent, even if the original problem is resolved.
Sensitization: Some people may become sensitized to certain fillers, making them more prone to allergic reactions or other adverse responses in the future.
Kingston upon Thames, Surrey, United KingdomKT2 6LX
Protecting lip fillers while tanning can be tricky, as both exposure to UV rays and the drying effects of tanning beds can negatively impact the longevity and appearance of your enhancements.
**Ultraviolet (UV) radiation** from tanning beds directly damages collagen and elastin, the proteins that give skin its structure. This damage can lead to premature aging, wrinkles, and uneven texture – all factors that can affect the way lip fillers look and last.
The **drying effects** of tanning beds can also be problematic for lip filler. Dehydrated skin is more prone to fine lines and wrinkles, which can make fillers appear less plump and natural. It can also cause the filler to migrate or settle unevenly.
While there’s no foolproof way to completely protect lip fillers during tanning, here are some tips to minimize potential damage:
Avoid Tanning Beds Altogether: The safest option is to forgo tanning beds entirely. UV exposure accelerates skin aging and increases the risk of skin cancer.
Limit Exposure Time: If you do choose to tan, keep your sessions short (10-15 minutes) and avoid frequent visits.
Apply Lip Balm: Use a high-SPF lip balm with UVA and UVB protection before and after tanning. Reapply frequently, especially if you’re sweating or swimming.
Stay Hydrated: Drink plenty of water to keep your skin hydrated both before and after tanning.
Consult with Your Provider: Talk to the injector who placed your lip fillers about your tanning plans. They may have specific recommendations or advise against tanning altogether.
Remember, protecting your skin health is paramount. Consider the potential risks of UV exposure and prioritize sun safety for long-lasting results and a healthy complexion.
Minimizing exposure time to UV radiation is paramount when trying to protect lip filler injections.
Excessive tanning bed use can break down hyaluronic acid, the primary ingredient in most lip fillers. This breakdown leads to faster degradation and loss of volume, diminishing the results of your treatment.
Keeping sessions short significantly reduces the amount of UV damage inflicted on the filler and surrounding tissues. Aim for 5-10 minutes at most per session, depending on the type of tanning bed and your individual skin sensitivity.
Remember, consistency is key. Instead of lengthy sessions once or twice a week, consider more frequent but shorter sessions to achieve a gradual tan without risking filler damage.
Always consult with your injector before engaging in any tanning activities, especially after lip injections. They can provide personalized advice based on your specific treatment and skin type.
* Choose lowerintensity beds.
Minimizing exposure to UV radiation is crucial for preserving the longevity and appearance of lip fillers.
When it comes to tanning beds, lower-intensity options pose a lesser risk compared to high-powered ones.
Here’s why:
* **Lower Energy Output:** Lower-intensity beds emit less ultraviolet (UV) radiation.
* UV radiation can break down hyaluronic acid, the primary component of most lip fillers, leading to premature degradation and a loss of volume.
Choose beds with lower wattage bulbs or those specifically designed for shorter tanning sessions.
If possible, opt for a bed that offers adjustable intensity levels, allowing you to customize your exposure and reduce potential damage.
Remember, even short exposures can have cumulative effects over time.
* Wear protective eyewear.
Minimizing exposure to UV rays is crucial for preserving the longevity and appearance of lip filler.
Here’s a breakdown of why and how to protect your investment:
UV Damage
Just like skin, hyaluronic acid fillers (the most common type) can be degraded by UV radiation.
Exposure to the sun’s rays can break down hyaluronic acid molecules, leading to faster breakdown of the filler and a diminished effect.
Color Changes
UV exposure can also cause discoloration in some lip fillers, especially those with pigments.
This can result in an uneven or unnatural appearance.
Weakening of Results
Sun damage weakens the overall structure and volume provided by lip filler, making it less effective over time.
Increased Risk of Complications
Excessive sun exposure can increase the risk of inflammation, irritation, and other complications at the injection site.
While tanning beds pose a higher risk than natural sunlight, it’s still crucial to protect your lip filler from any form of UV radiation.
Wear protective eyewear specifically designed for sun or UV protection when you are exposed to these rays.
These glasses can help minimize the amount of harmful UV light that reaches your lips and eyes.
Several factors can influence the cost of lip filler treatments, ranging from geographic location and practitioner experience to the specific type of filler used and the desired treatment area.
**Geographic Location:**
Like many medical procedures, lip fillers are often more expensive in metropolitan areas with a higher cost of living. Urban clinics may charge more due to overhead costs associated with larger spaces, specialized equipment, and a greater demand for services.
Contact Us
It’s Me and You Clinic – Anti-Wrinkle, Dermal Filler and Skincare Clinic, Kingston, Surrey
Kingston upon Thames, Surrey, United KingdomKT2 6LX
**Practitioner Experience and Expertise:**
Highly experienced and renowned injectors typically command higher fees. Their expertise translates into better results, reduced risk of complications, and often a longer-lasting outcome. Clients may be willing to pay more for the skills and reputation of a seasoned professional.
**Type of Filler Used:**
Different types of lip fillers are formulated with varying ingredients and consistencies. Premium hyaluronic acid fillers, known for their smoother application, longer duration, and potentially more natural-looking results, usually cost more than basic fillers.
**Treatment Area:**
The size of the area to be treated directly impacts the volume of filler required. Treating larger areas or desiring significant augmentation will naturally involve a higher cost due to the increased amount of product needed.
**Desired Outcome:**
Complex treatments, such as adding definition, reshaping the Cupid’s bow, or correcting asymmetries, often require more precision and skill, potentially leading to a higher cost. Simple lip plumping may be less expensive.
**Additional Services:**
Some clinics offer additional services like consultations, topical numbing creams, or post-treatment care packages that can add to the overall price.
It’s important to note that price should not be the sole determining factor when choosing a lip filler provider. Prioritize safety, experience, and a good communication style with your injector.
Desired Volume
Determining the *cost* of lip filler injections involves a complex interplay of factors, making it difficult to arrive at a single definitive price.
One primary factor influencing cost is the *volume* of filler required. Typically, a syringe contains a predetermined amount of filler. The number of syringes needed depends on the desired outcome, with larger lips requiring more volume and thus increasing the overall expense.
Another key determinant is the *type* of dermal filler used. Different brands and formulations utilize varying concentrations of hyaluronic acid or other substances, which can significantly impact price. Higher-quality, longer-lasting fillers often command a premium compared to less expensive options.
The **experience** and *reputation* of the practitioner administering the treatment also play a role. Highly skilled injectors with extensive experience and positive patient reviews may charge more due to their expertise and demand.
Geographic location matters as well. Costs in metropolitan areas or regions with a higher cost of living tend to be higher compared to more rural locations.
*Desired volume* is a crucial factor influencing both the *cost* and outcome of lip filler injections. It’s essential to have realistic expectations based on individual anatomy and desired aesthetics.
A thorough consultation with a qualified practitioner can help determine the appropriate volume for your goals, ensuring a natural-looking enhancement while staying within a reasonable budget.
Hyaluronic Acid Type
Many factors can influence the cost of lip fillers, including the type of hyaluronic acid used.
Here are some key considerations regarding hyaluronic acid types and their impact on price:
* **Brand Reputation and Popularity:** Well-known and highly regarded brands often command higher prices due to perceived quality, research backing, and consistent results.
*
HA Molecular Weight:
Hyaluronic acid comes in different molecular weights, influencing its properties and cost.
Higher Molecular Weight HAs:**
These provide more volume and are often used for lip augmentation, leading to a potentially higher price point.
Lower Molecular Weight HAs:
These are better suited for finer lines and wrinkles and may be less expensive.
*
HA Cross-Linking Density:
Cross-linking refers to the connections between hyaluronic acid molecules, influencing its longevity.
Higher Cross-Linking Density:
Results in longer-lasting filler but may be pricier.
Lower Cross-Linking Density:
Offers a more subtle effect and a shorter duration, potentially making it less expensive.
* **Purity and Formulation:** Premium hyaluronic acids with advanced formulations and higher purity levels often come at a higher cost.
Remember that the most important factor is choosing a qualified and experienced injector who can assess your needs and recommend the best hyaluronic acid type for your desired outcome.
Geographic Location
Cost Variations Across States
Geographic location significantly influences the cost of cosmetic procedures like lip fillers.
This variation stems from several factors:
Cost of Living: States with a higher cost of living generally have higher prices for goods and services, including medical procedures.
Demand and Competition: Areas with a high demand for cosmetic procedures and a limited number of providers may see inflated prices due to increased competition.
Provider Experience and Reputation: More experienced and highly regarded practitioners often charge higher fees reflecting their expertise.
Location Type: Urban centers tend to have higher costs compared to rural areas.
For instance, states like California, New York, and Massachusetts, known for their high cost of living, may see lip filler procedures priced considerably higher than in states like Texas, Florida, or Tennessee where the cost of living is lower.
It’s important to research prices from multiple providers within your desired geographic area to compare costs and find a balance between price and quality.
Remember that pricing should not be the sole factor when choosing a provider. Consider factors like experience, qualifications, patient reviews, and consultation process as well.
Determining the cost of lip filler is multifaceted and involves considering various factors beyond just the product itself.
Additional considerations include the injector’s experience and reputation, geographic location, clinic overhead costs (rent, staff, equipment), and desired outcome complexity. A highly sought-after injector in a metropolitan area with substantial overhead will likely charge more than a newer injector in a smaller town.
Furthermore, the amount of filler used directly impacts cost. A “top-up” treatment requiring less product will be less expensive than a complete transformation involving significant volume.
Consultation fees can add to the overall expense. These consultations allow potential patients to discuss their goals with the injector, understand the process, and assess if the injector’s style aligns with their aesthetic vision. Consultation fees vary widely; some injectors may waive them if you proceed with treatment, while others charge a fixed fee regardless.
It’s important to remember that opting for the cheapest option isn’t always the wisest. Inexperience or low-quality products can lead to complications and unsatisfactory results, potentially requiring corrective procedures at an additional cost.
Aftercare Products
When considering lip fillers, it’s crucial to understand that the initial cost isn’t the only factor influencing your overall expense. Additional considerations and post-procedure care products can add significantly to the price.
One important factor is the expertise of the injector. Highly experienced professionals with a proven track record often charge more due to their skill, knowledge, and use of premium products.
The specific filler used also plays a role in cost. Different brands and formulas have varying concentrations of hyaluronic acid, which impacts the price per syringe.
Treatment location is another consideration. Prices can fluctuate based on geographic location and the popularity of cosmetic procedures in a particular area.
Aftercare products are essential for optimal healing and maintaining results. These typically include:
* **Ice packs:** For reducing swelling and discomfort immediately following treatment.
* **Arnica cream or gel:** Can help minimize bruising and inflammation.
* **Lip balm or ointment:** To keep lips hydrated and prevent dryness, especially during the initial healing period.
* **Saline solution or saline wipes:** For gently cleansing the treated area.
The cost of aftercare products can vary depending on brand, quality, and quantity. Investing in reputable products designed for post-filler care is recommended for a smooth recovery process.